
Introduction to BookStack
Session 1: Understanding the Characteristics of a Good Knowledge Management System
Duration: 15-20 minutes
Theme: Understanding what makes a good knowledge management system
Methodology
Instructions for Participants
Learning Outcomes:
Session 2: Introduction to BookStack
Duration: 1 hours
Theme: Introduction to BookStack, its use, and capabilities
Methodology
Materials Needed: Screen, Laptop, and Pre-prepared BookStack instance.
Outcome: Participants will understand the purpose of BookStack and feel ready to explore it.
Session 3: Creating an Account and Setting up BookStack
Duration: 20 minutes
Theme: Setting up a BookStack account
Methodology
1. Account Creation
2. Accessing the Main Dashboard
After logging in, you will see the main dashboard. This dashboard has sections for:
Activity:
Materials Needed: Participants' devices, shared BookStack instance URLs.
Outcome: Participants will have their own BookStack accounts and access to the dashboard.
Session 4: Dashboard Overview of BookStack
Duration: 30 minutes
Theme: Understanding the main features of the BookStack dashboard
Methodology
Outcome: Participants will understand the structure of BookStack and how to use its main navigation features.
Session 5: Creating Books, Chapters, and Pages
Duration: 30 minutes
Theme: Hands-on creation of content in BookStack
Methodology
Outcome: Participants will be able to create, edit, and format Books, Chapters, and Pages in BookStack.
Session 6: Organizing and Structuring Knowledge
Duration: 1 hour
Theme: Organizing content effectively within BookStack
Methodology
Outcome: Participants will be able to organize and structure their knowledge logically using Books, Chapters, and Pages.
Session 7: Page & Book Settings
Duration: 20 minutes
Theme: Understanding the differences in settings for Books, Chapters, and Pages
Methodology
Outcome: Participants will understand how to customize and manage access to content.
Session 8: Collaborating on Content
Duration: 15 minutes
Theme: Using BookStack for team collaboration
Methodology
Demonstrate the process of (1)inviting team members, (2)assigning roles, and (3)setting permissions.
Users can have only one role at a time, but roles can be changed whenever needed.
- Setting Permissions for Books, Chapters, and Pages
Permissions can be customized for specific Books, Chapters, or Pages. This is useful when certain content should only be seen by certain users or roles.
- Go to the Content (Book, Chapter, or Page) you want to set permissions for.
- Click on the "Lock" Icon: This is located at the top-right of the page.
- Customize Permissions:
- Uncheck "Inherit Permissions" (if checked).
- Click "Add Permission" and choose the specific role (Admin, Editor, or Viewer) or individual users.
- Select whether they can View, Edit, or Delete the content.
- Save Permissions: Click "Save" to apply the changes.
- You invite Priya as a Viewer so she can only view content.
- Later, you change Priya's role to Editor so she can help update and add new content.
- You set custom permissions for the "HR Policies" Book so that only the HR Team can view or edit it.
Activity:
Outcome: Participants will be able to add team members, assign roles, and collaborate on content.
Session 5:9: Revision, Export, Move, Copy, and Watch Features
Duration: 20 minutes
Theme: Advanced content management features in BookStack
Methodology
Overview of Features:
Revisions:
How to View Page Revisions
ShowDatehow& Time of the change.
DemonstrateIfhowyou want toexportrestorePages,anChapters,earlierandversion,BooksclickasthePDF,RevertHTML,buttonornextplaintotext.that version.HighlightConfirm theuseactioncasestoforrestoreexportingthecontent,pagesuchtoasthatsharing offline or creating printed documentation.version.
Move:
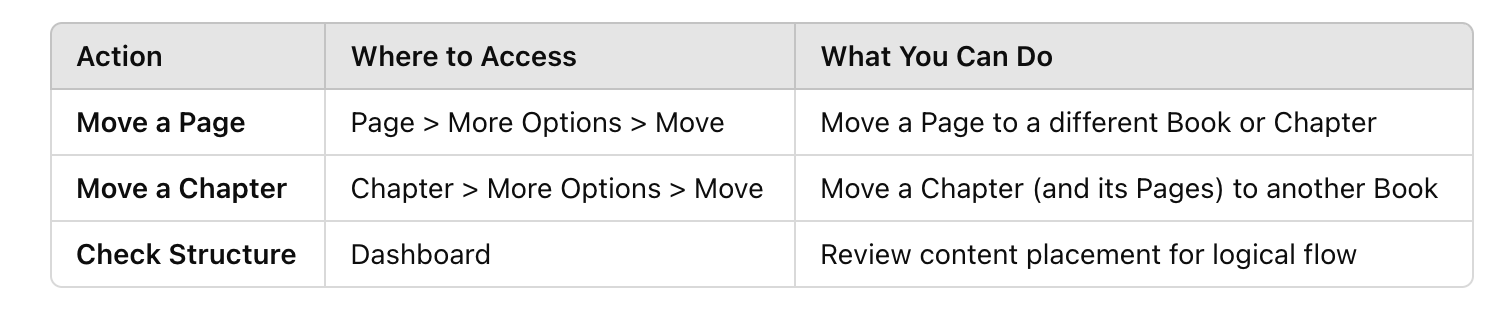
How to Move a Page from One Book to Another
Steps to Move a Page:
Notes:
ExplainIfhow toyou move a Pageorto a different Book without selecting a Chapter, it will be placed at the top of the Book.
How to Move a Chapter from One Book to Another
Steps to Move a Chapter:
Notes:
Copy:
How to Copy a Page
Steps to Copy a Page:
Notes:
Demonstratehow- You can create multiple copies of the same Page in different Books or Chapters.
How to Copy a PageChapter
Steps Chapter.to Copy a Chapter:
WatchNotes::
ShowWhenhowyou copy a Chapter, all the Pages inside the Chapter are copied too.
Watch:
How to "watch"Watch" a Book, Chapter, or Page
Steps to Watch Content
What Happens Next?
If you want to manage your watch notifications in(like userturning settings.them off), follow these steps:
Steps to Manage Watch Notifications
Activity:
- Each participant creates a new Page, makes several edits, and then reverts to an older version.
- They will then export the page to a PDF and move or copy it to another Book.
- Finally, they will "watch" one of the Books and check for notifications of changes.
Outcome: Participants will be able to use advanced features like Revision, Export, Move, Copy, and Watch for better content control and collaboration.
Session 9: Customization, Theme Settings, and Final Q&A
Duration: 30 minutes
Theme: Customizing themes, site settings, and Q&A session
Methodology
- Customization:
- Teach participants how to customize themes and set the site's logo, title, and homepage layout.
Customizing the theme allows you to change the overall look and feel of your BookStack site. This includes changing colors, fonts, and layout styles.
Steps to Customize the Theme:
- Log in as an Admin.
- Go to Settings (found in the side navigation).
- Select Appearance/Customization (or "Site Settings," depending on your version of BookStack).
- Here, you can adjust various aspects of the theme, such as:
- Primary Color: Change the main color used in headers, buttons, and highlights.
- Secondary Color: Choose a secondary color to complement the primary color.
- Custom CSS/HTML: If you have advanced customization needs, you can add your own CSS or HTML code.
Customizing the theme allows your organization to match BookStack’s appearance with its brand colors, making the system look more professional and familiar to users.
Setting the Site’s Logo
Adding a logo makes your BookStack site feel more branded and official.
Steps to Set the Logo:
- Go to Settings and open the Site Settings tab.
- Look for the option to upload a Logo.
- Upload an image file (like PNG or JPG) from your computer.
- Save the changes.
The logo appears at the top of every page, making the platform feel like part of your organization's official tools. It also improves brand recognition for users.
Setting the Site’s Title
The site title is the name that appears in the browser tab and on the homepage.
Steps to Set the Site’s Title:
- In the Settings menu, go to Site Settings.
- Find the Site Title option.
- Enter the name of your site (e.g., “Aikyam Knowledge Hub” or "Team Documentation").
- Save the changes.
A proper site title gives context to users about what the platform is for. It also helps with SEO (search engine optimization) and makes it easier for users to recognize your site in browser tabs.
Setting the Homepage Layout
The homepage layout controls what users see when they first visit the site. You can decide to display a welcome message, specific books, or other content.
Steps to Set the Homepage Layout:
- Go to Settings and open Site Settings.
- Look for the Homepage Content option.
- You can choose what content to display:
- List of Books: Display a list of all Books.
- Custom Welcome Page: Set up a custom page as the homepage.
- Save the changes.
Setting a homepage layout helps new users understand the purpose of the site immediately. It provides quick access to important content, making navigation easier.
Steps to Manage Visibility Settings
Steps to Export Content
Activity: Participants customize the site logo, title, and homepage.
Outcome: Participants will know how to customize the appearance and functionality of their BookStack instance.