# Module 3 | Introduction to Ghost
##### Session 1
1 hour
##### Theme
Understanding the characteristics of a good website
##### Materials needed
For the participants: Sticky notes, cards and sketch pens
For the facilitator: Sticky notes and sketch pens
##### Methodology
**Ground rules to set for all sessions:**
\- Bring only the devices you need to the session. *Note to facilitator: Explain here what is needed for this particular session*
\- Mute mobile phones before you put them away
\- Encourage the participants to take space and make space. To take up space is to speak up and participate actively in discussions and putting their ideas and perspectives across. It is equally important to make space for others to do the same. *Note to facilitators: Ensure you check in about this throughout the sessions, especially by making space for those who are not used to taking up space or struggling to do so.*
\- This is a safe space, and we encourage everyone to check their privilege and ensure that we do not discriminate in speech or action.
\- Do remember there are no right or wrong answers. *Note to facilitator: Repeating this during the sessions and activities helps participants speak up more freely.*
- Check in if all the participants have thought through the key stakeholders for their projects, as well as their needs. Participants can take turns to describe their individual project stakeholders and needs.
*Note to facilitator: This is a good time to check in about challenges faced during the process, or what they found most insightful about the process.
*
- Moving on the next activity, distribute a card, sticky notes and a sketch pen to all participants. Ask everyone to think of their favourite websites and three things they like most about the website. They can write each item on a sticky note and put it on the card. They need not identify the website if they don't want to.
*Note to facilitator: Explain to the participants that a favourite website can also be a website that they frequent every day, like Imstagram or YouTube or Amazon.
*
- Give the participants 10-12 minutes for this activity. Collect the cards from the participants as they finish.
- The facilitator can then start grouping the sticky notes together in groups to represent characteristics like Content, Design, Responsiveness, UI, etc. placed on the table. You can find some useful website characteristics here: [https://wiki.aikyamfellows.org/books/build-a-beautiful-website-that-people-trust/page/guidelines-to-building-a-great-user-friendly-website](https://wiki.aikyamfellows.org/books/build-a-beautiful-website-that-people-trust/page/guidelines-to-building-a-great-user-friendly-website)
*Note to facilitator: An assistant may be needed for this sorting. Facilitators can also add their choices.
Some examples for the grouping below:
[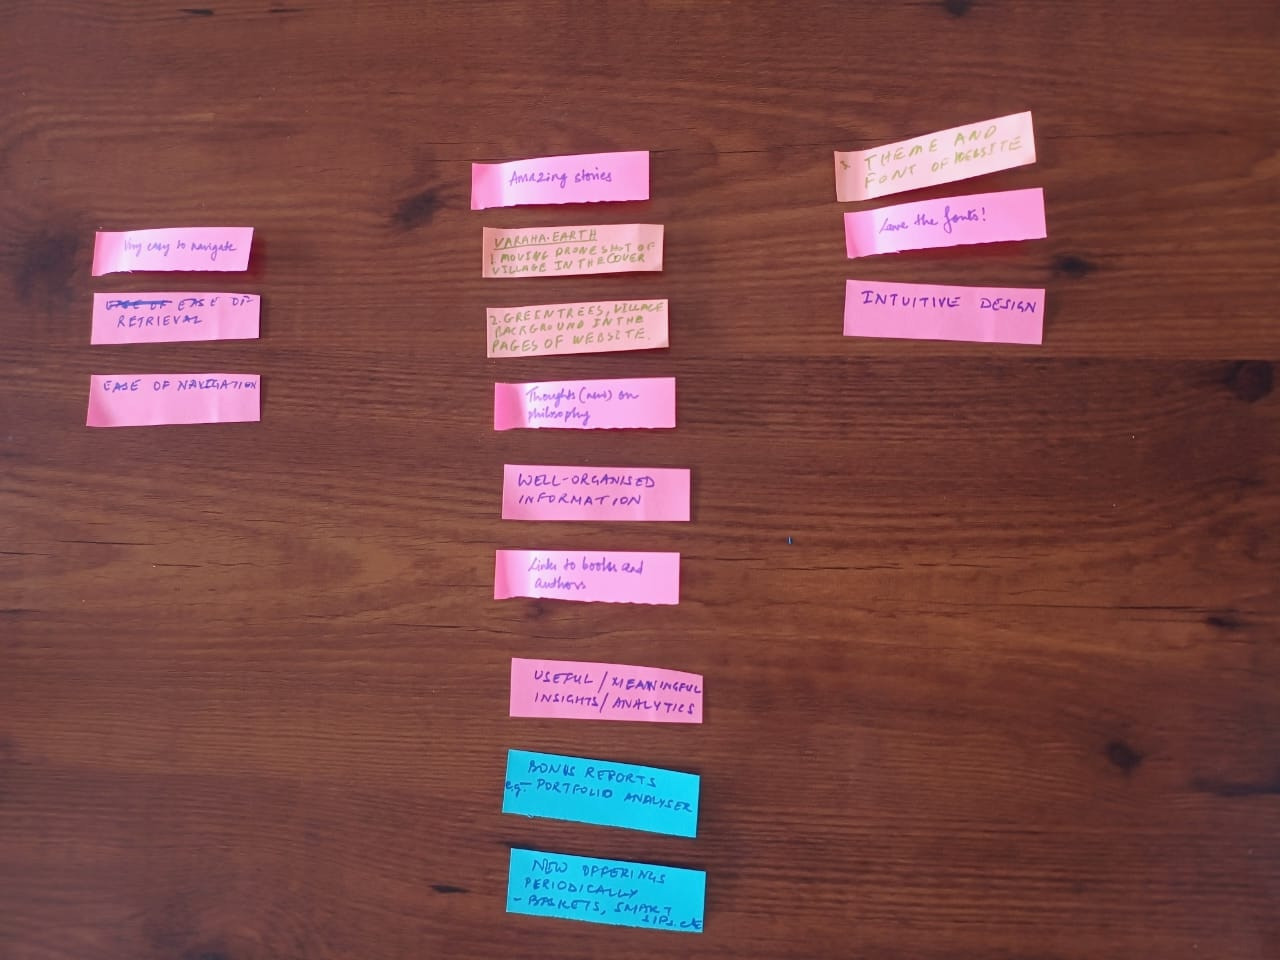](https://wiki.aikyamfellows.org/uploads/images/gallery/2024-12/whatsapp-image-2024-12-10-at-10-45-14.jpeg)* *[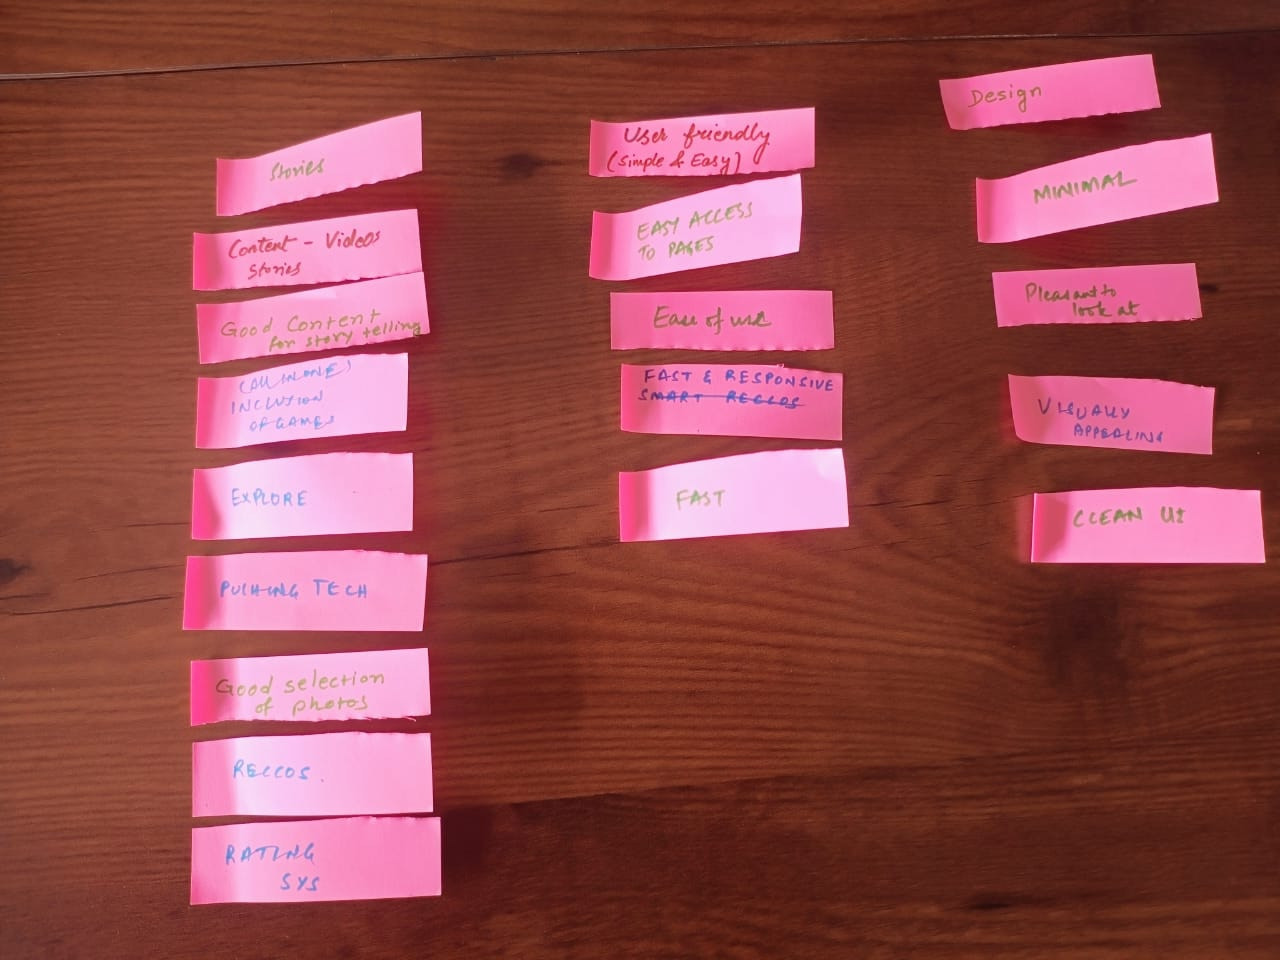](https://wiki.aikyamfellows.org/uploads/images/gallery/2024-12/whatsapp-image-2024-12-10-at-10-46-13.jpeg)*
- Invite participants to discuss what could be the common theme for each grouping. As they discuss and come up with answers, write down the headers for each grouping on a sticky note and place it on top of the grouping. This exercise should eventually visually represent that most of the characteristics falls under Content, and then, Design, and then other heads.
- Use this example to help the cohort understand why thinking through of content is so important for a website. Because telling the stories that your stakeholders want to know about or stay updated about keeps them engaged and coming back to your website. For Amazon, this may mean new products. For Instagram, this may mean more addictive reels; we all have doom scrolled on Instagram and would be familiar with this.
For changemaker websites, this often means stories about impact, case studies, program stories, etc.
- You can also reiterate the importance of writing content for the primary stakeholders. One example that can be used here is to ask participants if they have all used Amazon/Instagram.
Do they know the vision/mission of Amazon/Instagram? Would they know where to find it? Do they care enough to find out?
Explain how when we create websites, we often put things that are very important to us as an org. up front. Often, people have the vision/mission right up there on the home page, in prime space that could be used for impact numbers or impact stories. Funders and other stakeholder are definitely more interested in the actual work you have done or the change you are building than your intentions to do good.
Reiterate that while the vision and mission is extremely important to the organisation, it may not be that important to key stakeholders of the organisation's website.
##### Learning outcomes
- Understanding the various attributes that make for a good website
- Understanding the importance of content planning for websites
---
##### Session 2
2 hours
##### Theme
Introduction to Ghost
##### Methodology
**Ground rules to set for all sessions:**
\- Bring only the devices you need to the session. *Note to facilitator: Explain here what is needed for this particular session*
*- Mute mobile phones before you put them away*
\- Encourage the participants to take space and make space. To take up space is to speak up and participate actively in discussions and putting their ideas and perspectives across. It is equally important to make space for others to do the same. *Note to facilitators: Ensure you check in about this throughout the sessions, especially by making space for those who are not used to taking up space or struggling to do so.*
\- This is a safe space, and we encourage everyone to check their privilege and ensure that we do not discriminate in speech or action.
\- Do remember there are no right or wrong answers. *Note to facilitator: Repeating this during the sessions and activities helps participants speak up more freely.*
---
##### **Ghost Sessions**
- **Session 1- Ghost Introduction**
- **Session 2- Creating an Account and Setting up Ghost**
- **Session 3- Dashboard Overview of Ghost**
- **Session 4- Creating a Blog Post**
- **Session 5- Creating a Page**
- **Session 6- Explaining Post Settings & Page Settings**
- **Session 7- Saving and Publishing Posts & pages**
- **Session 8- Advance setting for site & Editing the Theme**
- **Session 9- Adding Team Members**
- **Session 10- Managing SEO**
#####
***Notes for the Facilitator***
Welcome, Before starting today’s session, please take a moment to carefully read through these important instructions:
**Preparation Time:-** Ensure you review the entire curriculum at least 40 minutes before the session begins. This will help you understand the flow of the session and address any last-minute clarifications or adjustments.
**Important Notes:-** There are special notes for facilitators included in this document. These notes highlight key points to focus on during the session.
**Materials & Readiness:-** Verify that all necessary materials, tools, or resources mentioned in the curriculum are prepared in advance.
*Before the session starts, make sure you have **Ghost Admin Access** for the Ghost website.*
**1-** This access is needed to manage and show things during the session.
**2-** If you don’t have admin access, please contact the backend support team ahead of time to get it set up.
---
##### Session 1:
Ghost Introduction
##### Theme:
To introduce participants to Ghost, a platform for creating websites, blogs, and newsletters, and inspire them to use it for storytelling.
##### Materials Needs:
- Projector or screen.
- Laptop with internet connection.
##### Methodology
***Facilitator***
**1- Welcome and Warm-Up (5 minutes):**
Welcome everyone! Today, we are going to explore Ghost, an amazing platform designed to help you share stories through websites, blogs, and newsletters. The best part? You don’t need any coding experience to get started.
**Have you ever wanted to share your stories with others but felt unsure about how to use the technology?**
\- Ghost is perfect for storytelling, whether you want to share your ideas, connect with a community, or showcase your work.
By the end of this session, you will feel confident and excited to explore Ghost.
**2. What is Ghost?**
***Facilitator:* **So, what exactly is Ghost? It’s a simple and user-friendly platform where you can create:
- **Websites** to showcase your work.
- **Blogs** for sharing stories and ideas.
- **Newsletters** to connect with your audience."
Now, let’s compare this to using a programming language. Imagine you want to create a blog and share weekly updates with your followers or audience. You could solve this problem in two ways:
***(Need to add a presentation for better understanding - Ghost vs code or wordpress )***
*Note for the Facilitator: Please open the provided document([link](https://docs.google.com/document/d/1Q2oTQ5T40jplKMNzudstuhjg_iC8Gayq992y3ozmDtU/edit?tab=t.0)) and share your screen with the participants. Go through the examples in the document*
**Example-**
**Option 1: Use Code -** You’d need to:
1. Write **HTML** for the structure of your website.
2. Use **CSS** to make it look good.
3. Add **JavaScript** for any interactive elements. etc….
This requires time, effort, and coding knowledge—and even small mistakes can cause big problems!

**Important Note:- **We are not saying you shouldn’t use code. If you enjoy coding or have the skills, it can be an amazing way to create a fully customized website. However, this session is designed for people who may not have coding knowledge or simply want a quicker and easier way to get started. Ghost is a perfect tool for that.
**Option 2: Use Ghost-** With Ghost, all of this is done for you:
1. Choose a template to design your blog.
2. Write and publish your stories using an easy editor—**no coding needed.**
3. Send newsletters directly using the built-in tools.
4. Building web pages for the site.
**For Example -** In simple terms, using code is like building a car from scratch which takes a lot of time and effort. while Ghost is like buying a ready-made car that you can customize and start driving right away. Ghost lets you focus on your content and storytelling without worrying about the technical parts.
**3. Show Examples (10 minutes)**
***Facilitator:***
Let’s look at some real-life examples to inspire you.
1. **[aikyam Fellows](https://aikyamfellows.org/):** This group uses Ghost to document stories about their amazing work in social impact. (Show on projector/screen)
2. **[The Ignite Foundation](https://impact.theigniteindia.com/):** Here’s another example. The Ignite Foundation shares powerful stories about their initiatives using Ghost. (Show on projector/screen)
**4. What Makes a Ghost Special? (10 minutes)**
***Facilitator***:
Here is why Ghost is so awesome:
1. **Storytelling Made Easy:** You can focus on your content without worrying about technical stuff.
2. **Customizable:** You can design your site the way you want.
3. **Built-in Tools:** Features like newsletters are already included—no need to set up extra tools.
##### Outcome:
Participants will understand the purpose of Ghost and feel motivated to explore it as a platform for storytelling.
---
##### Session 2:
Creating an Account and Setting up Ghost
##### Theme:
Guide participants to create their own Ghost account and set up their site.
##### Materials Needs:
- Participants’ devices
- Shared Ghost instance URLs **(provided by aikyam)**
##### Methodology :
**Sign up for Ghost :-**Guide participants through creating a Ghost account and setting up their site.
***Facilitator Instructions:***
*Note for the Facilitator:- (Before the session starts, please check that the Ghost link or access has been shared with the participants. This will help everyone be ready for the session.)*
1- Ask participants to open their web browser and navigate to the Ghost instance shared with them *(provided by aikyam before the session).*
2- Instruct them to click **“Get Started”** and guide them to sign up using their email and set up their site.
##### Outcome:
Participants will have their own Ghost account and access to the dashboard.
---
#####
Accessing the Ghost Backend:
**Go to the website:-** In your browser, enter the URL for the site provided **(e.g., xyzwebsite.com).**
**Access the backend:-** To access the Ghost admin dashboard, simply add **“/ghost”** to the website URL. For example, type **xyzwebsite.com/ghost** in the address bar.
**Login:-** Use the provided credentials to log in to the backend.
---
##### Session 3:
Dashboard Overview of Ghost
##### Theme:
Help participants get comfortable using the Ghost dashboard by explaining the main sections.
##### Materials Needs:
- Facilitator’s laptop
- TV screen & Devices of Participaints
##### Methodology
***Facilitator Instructions:***
Share your screen to show the Ghost dashboard and explain each section-
*(Dashboard, View site, Explore, Posts, Drafts, scheduled, Published, pages,tags,Profile)*
**Navigation to dashboard-** Once logged in, share your screen and walk the participants through the following sections:
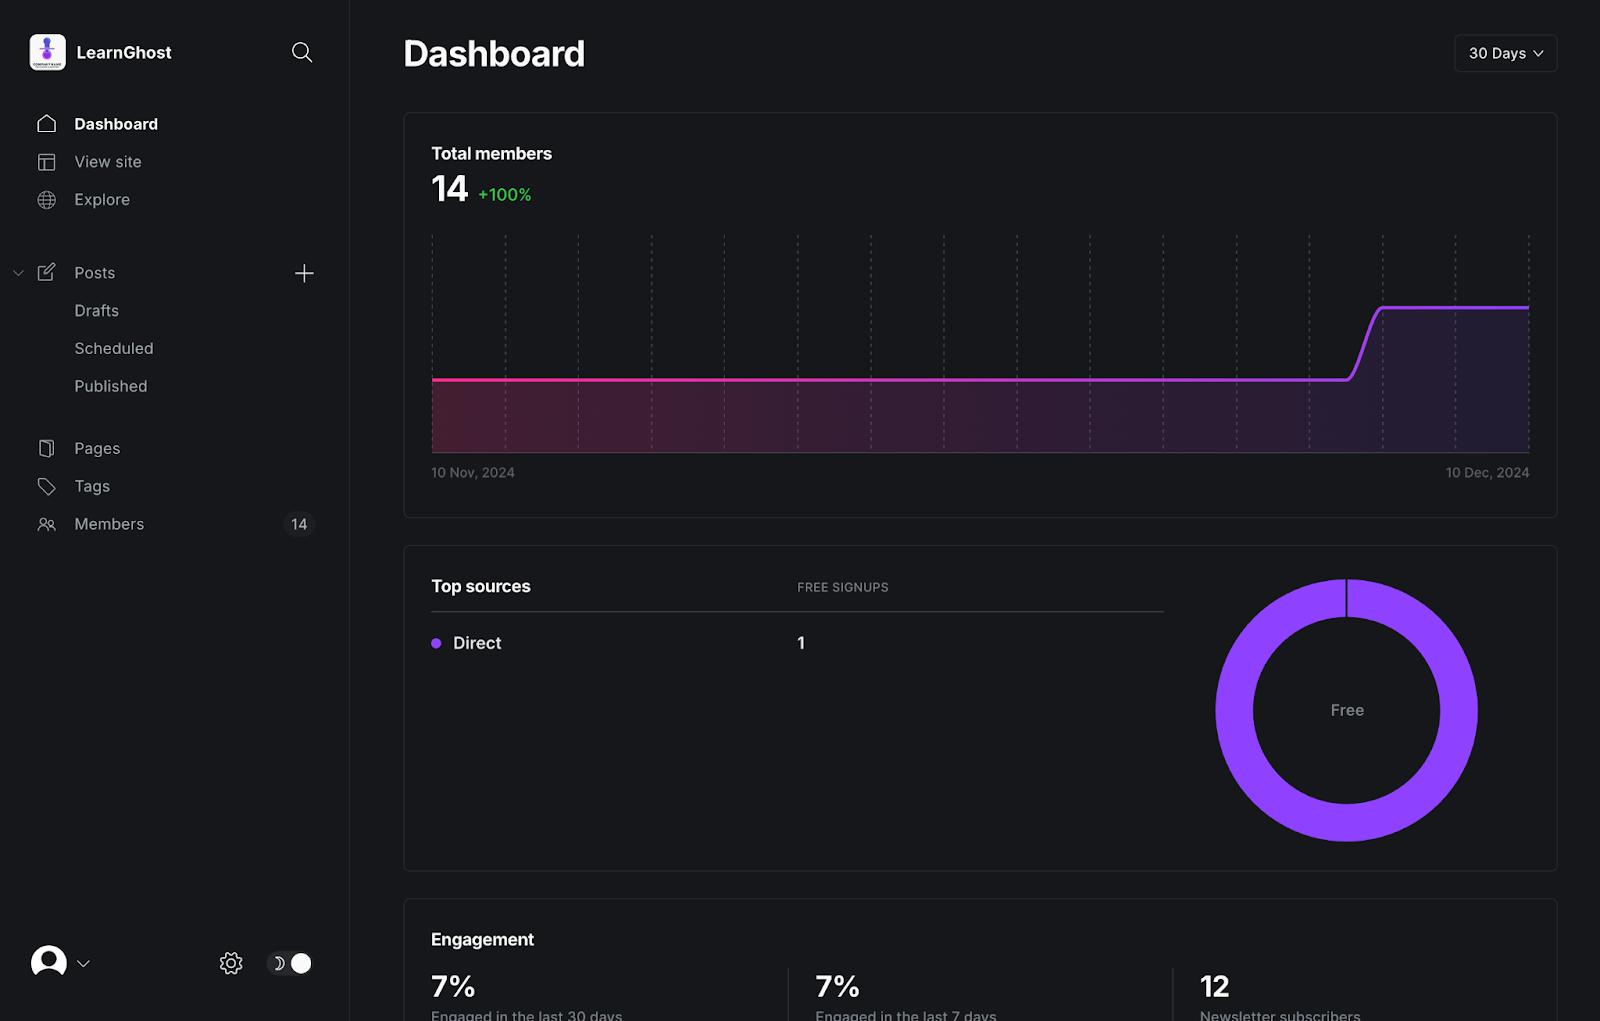
**1- Dashboard:-**
- This is the homepage of your Ghost backend. Here, you’ll see an overview of recent activity, posts, and others.
- **Where to click:** Direct the participants to the “Dashboard” tab on the left sidebar.
**2- View Site:-**
- This allows you to view the live version of your website.
- **Where to click:** In the left sidebar you can click on **"View site".** After clicking **"View site,"** you’ll see a small icon next to it. Click on this icon, and your website will open in a new tab.
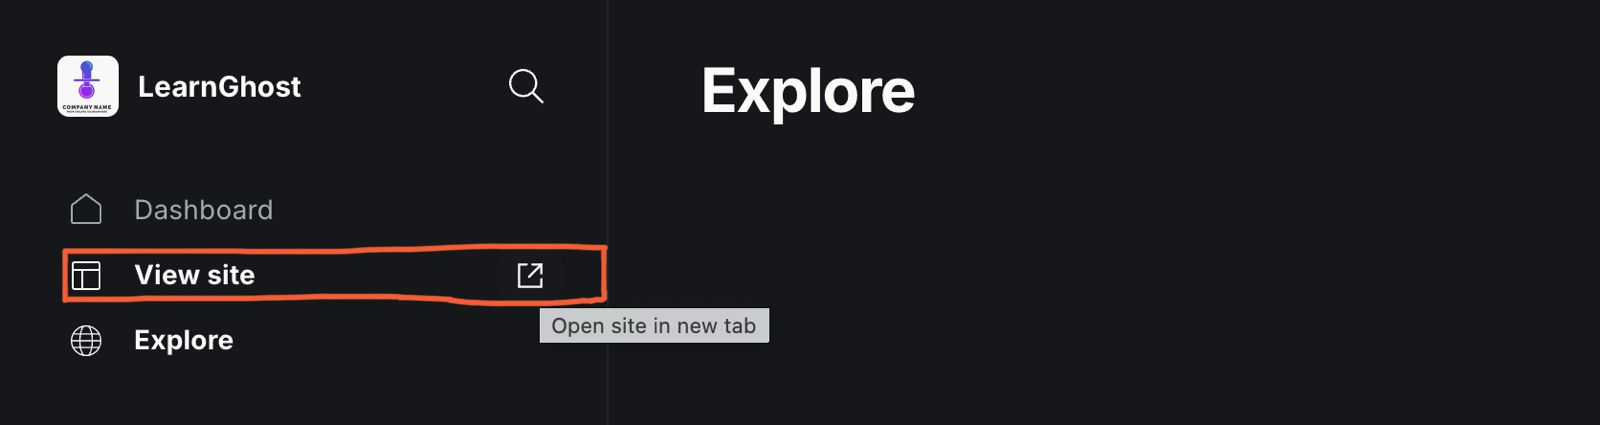
**3- Explore:-**
- Use this to explore other features and resources available on Ghost.
- **Where to click:** In the left sidebar, click **"Explore"** to find other tools and themes.
**4- Posts:-**
- This is where you can create, edit, and manage blog posts.
- **Where to click:** Click on **"Posts"** in the left sidebar to see a list of all posts. Here, you can create new posts, edit existing ones, and manage them.
**Creating a Post :-**
- After opening **"Posts",** you will see a **"+"** button. Click it to create a new post.
- In the top-right corner, there is a button labeled **"New Post"**. Click on it to create a new post.
**5- Published:**
- This section shows all the posts that are published.
- **Where to click:** Under **"Posts"**, click **"Published"** to view or edit the posts that are already published.
**6-Pages:**
- Pages are used for static content, such as *About, Contact,* and other important informate.
- **Where to click:** Click on **"Pages"** in the left sidebar to create and manage static pages.
**7- Tags:**
- Tags help categorize and organize your posts. You can add tags to your posts to make it easier for visitors to find related content.
- **Where to click:** Click on **"Tags"** in the left sidebar to add, edit, or delete tags.
**8- Profile:**
- This is where you can update your account details, password, and other settings.
- **Where to click:** Click on your profile icon in the left bottom corner and select **"Profile icon"** to make changes.
#####
Outcome:
Participants will understand how to use the Ghost dashboard, including the purpose of Posts, Pages, and Tags.
---
##### Session 4:
##### Creating a Blog Post
##### Theme:
To help participants create and format blog posts using Ghost, and gain confidence in using its key features.
##### Materials Needs:
- Facilitator’s laptop and TV screen
- Participants’ devices
##### Methodology
**Creating a Post:-** Teach participants how to create and format a post using Ghost. Show examples of posts to highlight the elements they will use.
**Explain the Activity:**
Let participants know they will practize creating a post by adding a title, uploading an image, writing content, and using extra elements like buttons and callout boxes.
***Facilitator Instructions:-***
Direct participants to the Posts section in the left menu. *(Ask participants to follow the same steps as you show on screen )*
**Guide them to:**
**1- Posts Section:-** On the left-hand menu, click on Posts. This will take you to the list of existing posts.
**2-New Post:-** After opening the **"Posts"** section, you have two options to create a new post:
- Option 1**:** Click the **"+"** button to create a new post.
- Option 2: In the top-right corner, click the **"New Post"** button to start creating a new post.
3- **Add a Title to Your Post:**
4- **Upload a Featured Image:**
- At the top of the editor, above the title area, you'll see an option labeled "**Add feature image"**
- Click it to upload an image from your device or choose one from ***Unsplash***.
**5- Start Writing Your Content:**
- Use the main editor area to write your **content**.
- Encourage participants to explore the editor’s basic formatting options like headings, bold, italics, and lists. etc……
**6- Use Additional Elements:**
Click the **“+”** button on the left side of the editor to add extra elements such as:

**Show the Available Features:**
- **Buttons**: show how to add a button for linking to other pages or sites.
- **Callout Boxes:** Explain how callout boxes can highlight key information.
- **Images:** Show how to add images within the post.
- **Markdown:** Briefly explain Markdown for text formatting.
- **HTML:** Show how to switch to HTML mode for custom code.
- **Divider:** Show how to add a divider.
- **Gallery:** Explain how to add an image gallery.
- **Product Card:** Show how to add a product card *(if relevant).*
***Facilitator Note-***
Share this [Style Guide example](https://eihei.fueko.net/style-guide/) link with participants so they can see a visual example of how to use the available features. to make their posts look better. Go over basic elements like headings, lists, quotes, and images to help them organise and style their post.
**Activity: Participants will Create Their Own Blog Post:-** Ask participants to create a blog post on a topic of their choice and ask them to use at least 5 of the features in the blog.
***Post Settings***
**Where to Access Post Settings:**
- Look at the top-right corner of your screen and find the **Settings icon**.
- Click on the icon to open the Post Settings Panel.
**Key Post Settings to Adjust:**
1. **URL**: Edit the post URL if necessary for SEO or clarity.
2. **Publish Date:** Set a future or backdated publishing schedule.
3. **Tags:** Add relevant tags to organize your post by topic.
4. **Excerpt:** Write a brief summary that will appear in previews.
5. **Authors:** Ensure the correct author is assigned.
6. **Featured Post:** Find the "Featured" option, turn it on, and click "Update" to save the changes.
***Saving and Publishing:-***
***Facilitator - (check the reference image )***
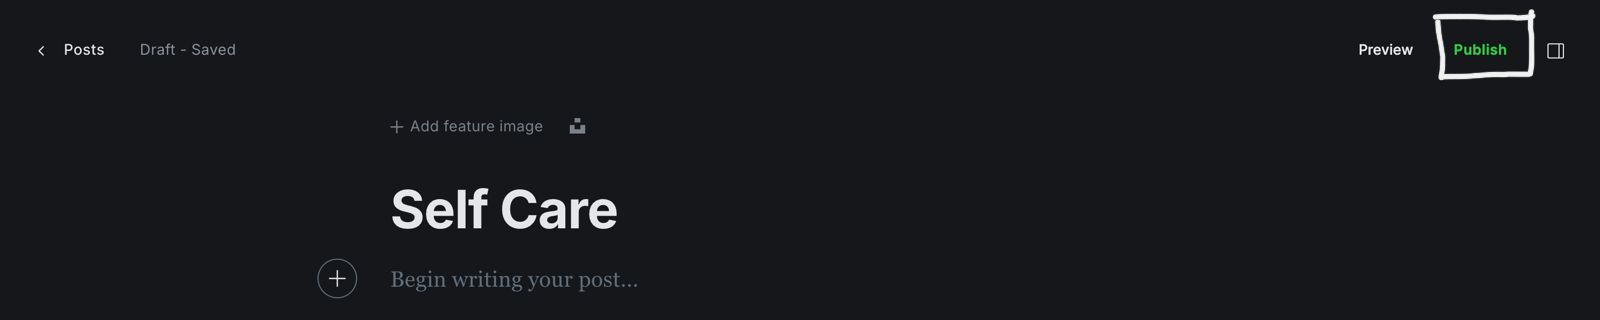
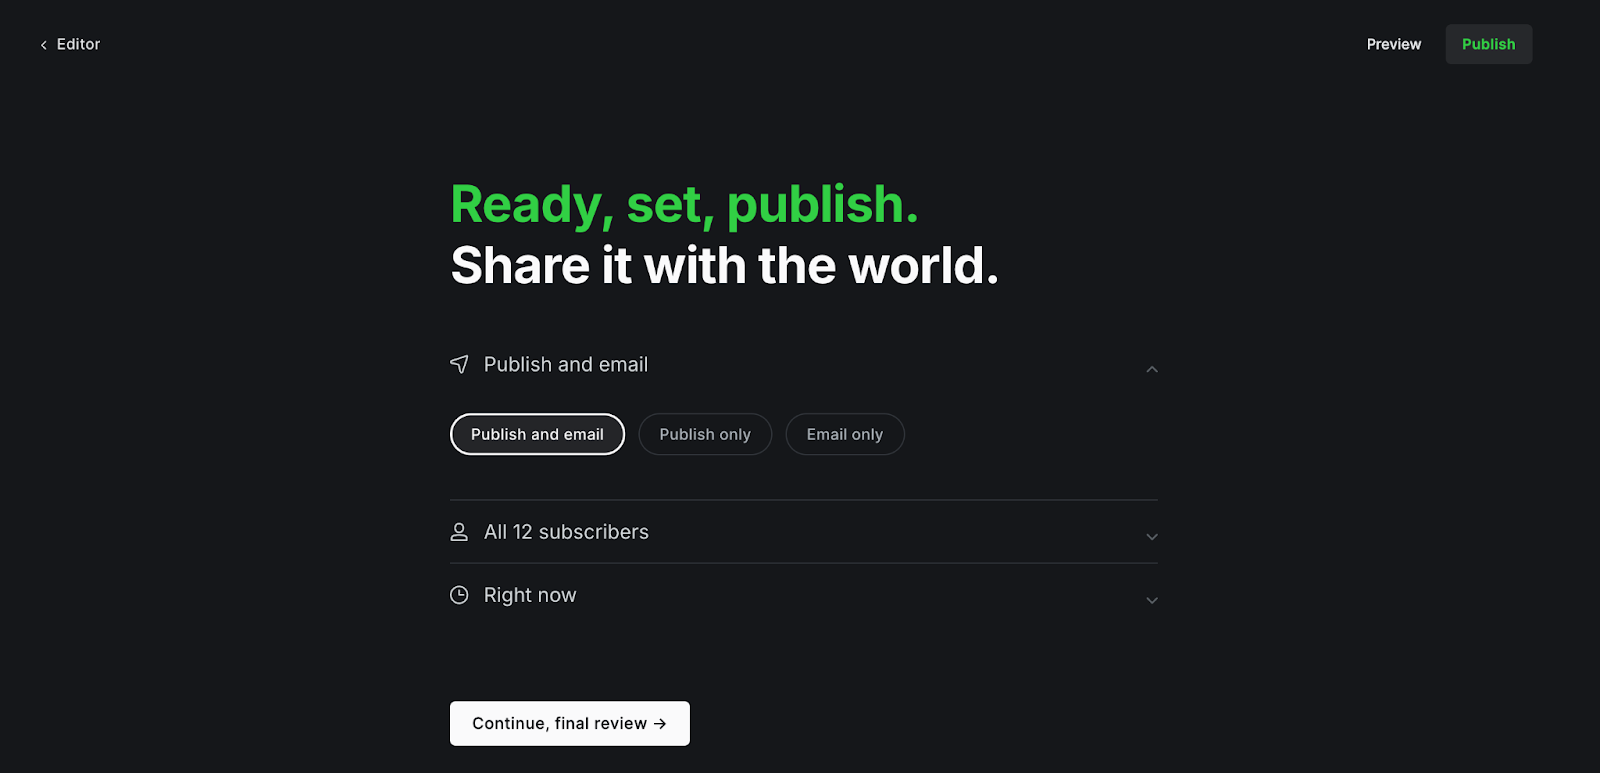
To publish the post and page , look at the top-right corner of your screen. You will see a publish button—click on that.
**Step-by-Step Instructions for Saving and Publishing**
- Saving as Draft
- Publishing Immediately
- Scheduling for Later
- Publish Only (Without Email)
- Publish and Email (Notify Subscribers)
- Email Only (Without Publishing)
##### Outcome -
Participants will -
- Create and format a blog post with a title, content, and featured image.
- Use extra elements like buttons or callout boxes.
- Adjust post settings (tags, excerpts, etc.).
- Gain confidence in using Ghost to create and publish posts.
---
##### Session 5 :
Creating a page
##### Theme:
To help participants create pages using Ghost, and gain confidence in using its key features.
##### Materials Needs:
- Facilitator’s laptop and TV screen
- Participants’ devices
##### Methodology
**Creating a Page:**
***Facilitator:-***
Explain the difference between posts and pages, and Learn how to create a new page.
- **Post:** A blog post is for regular, time-sensitive content like articles, news updates, or stories.
- **Page:** A page is for timeless, static content that doesn't change often, like an About Us and Contact, or page. Pages are like important information sections that you can find in the website's menu.
**Example** -Show this example to participants to get the idea how to create a web page.
*Note :- The Facilitator should look at this example before the session starts to understand the interface (UI) and get an idea of how to create a page using Ghost.*
- [https://aikyamfellows.org/about/](https://aikyamfellows.org/about/)
- [https://impact.theigniteindia.com/about/](https://impact.theigniteindia.com/about/)
- [https://ninetydegrees.in/get-involved/ ](https://ninetydegrees.in/get-involved/)
***Facilitator Instruction:*** Guide participants through creating a blank page. *(Ask participants to follow the same steps as you show on screen )*
**Guide them to:**
**1- Page Section:-** On the left-hand menu, click on Pages. This will take you to the list of existing pages.
**2-New page:-** After opening the **"page"** section, you have two options to create a new page:
1. Option 1: Click the **"+"** button to create a new page.
2. Option 2: In the top-right corner, click the **"New Page"** button to start creating a new page.
**3- Add a Title to Your Page:**
**4- Upload a Featured Image:**
- At the top of the editor, above the title area, you'll see an option labeled **"Add feature image"**
- Click it to upload an image from your device or choose one from **Unsplash**.
**5- Start Writing Your Content:**
- Use the main editor area to write your content.
- Encourage participants to explore the editor’s basic formatting options like headings, bold, italics, and lists. etc……
**6- Use Additional Elements:**
Click the **“+”** button on the left side of the editor to add extra elements such as:
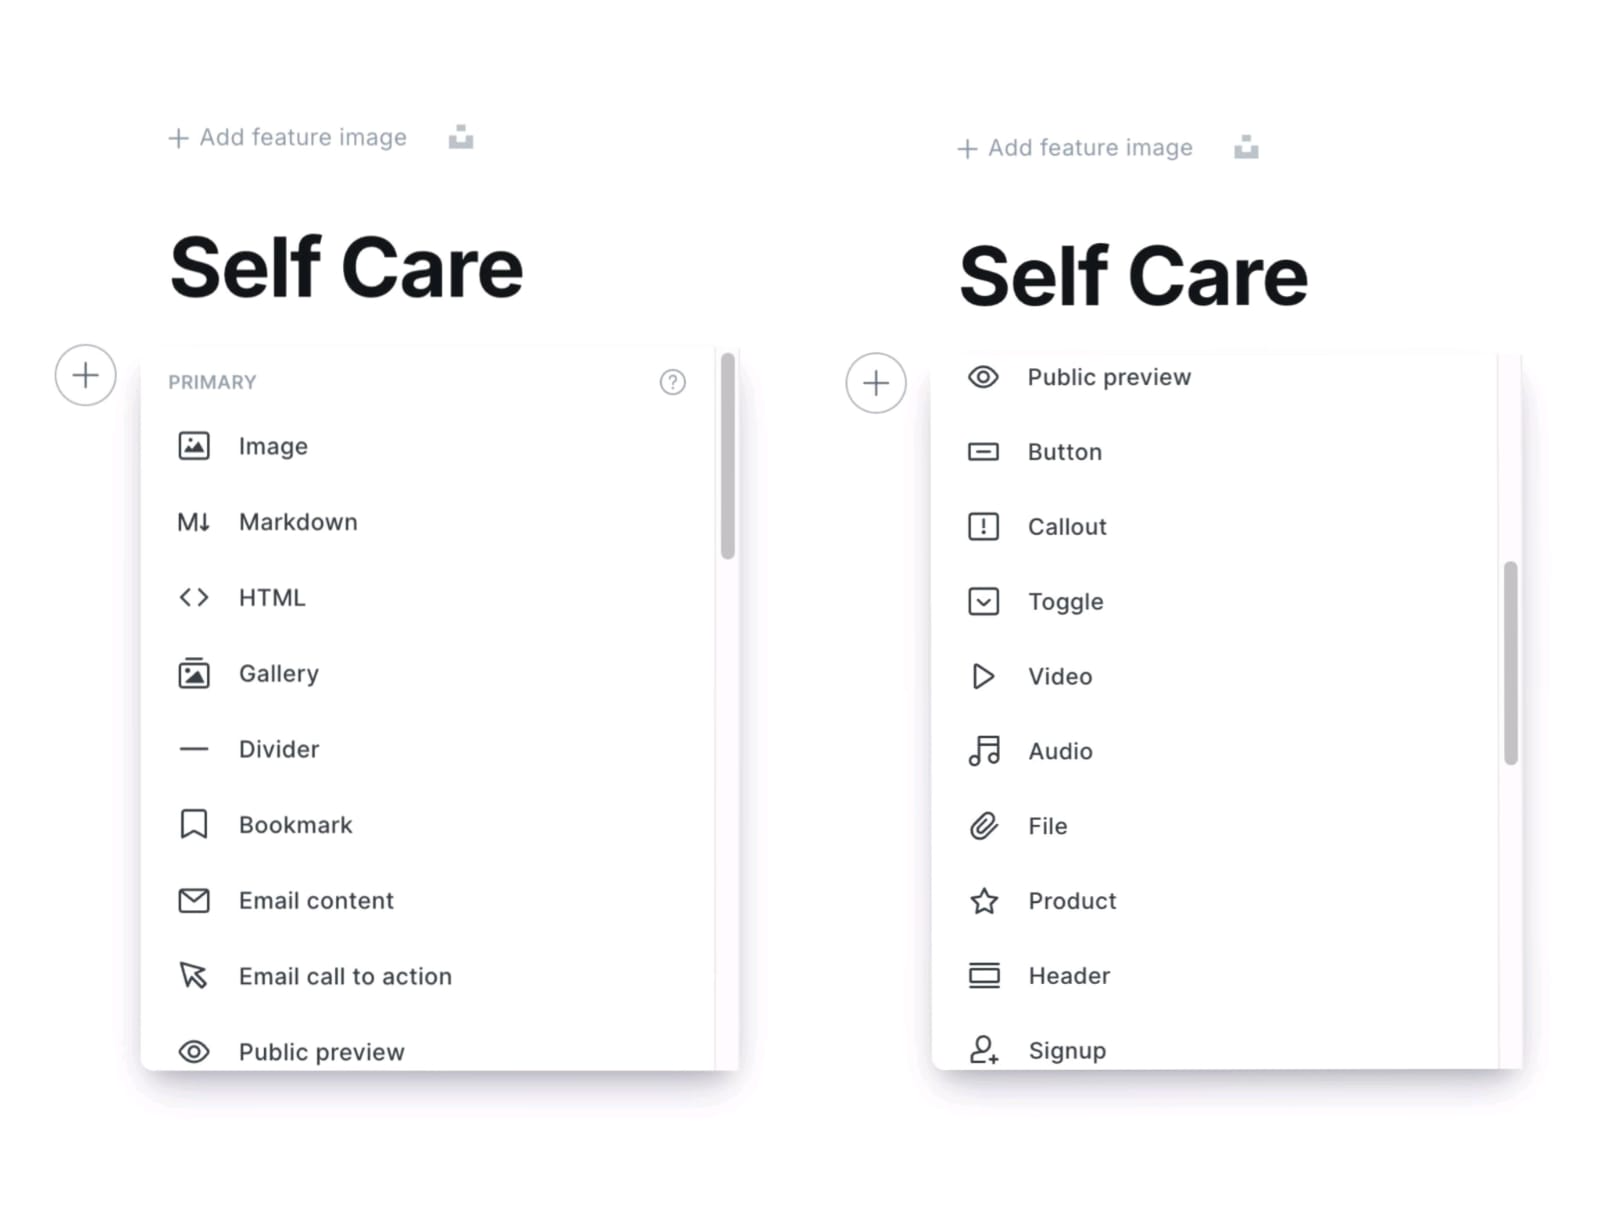
**Show the Available Features:**
- **Buttons:** show how to add a button for linking to other pages or sites.
- **Callout Boxes:** Explain how callout boxes can highlight key information.
- **Images:** Show how to add images within the page.
- **Markdown:** Briefly explain Markdown for text formatting.
- **HTML:** Show how to switch to HTML mode for custom code.
- **Divider:** Show how to add a divider.
- **Gallery:** Explain how to add an image gallery.
- **Product Card:** Show how to add a product card (if relevant).
***Facilitator Note-*** Share this [Style Guide example](https://eihei.fueko.net/style-guide/) link with participants so they can see a visual example of how to use the available features. to make their pages look better. Go over basic elements like headings, lists, quotes, and images to help them organise and style their page.
**Activity: Participants will Create Page**
Ask participants to pick one of the given examples and recreate that web page using the same images and content (they can use dummy content). If they prefer, they can also create their own web page for practice.
- [https://ghost.aikyamsolve.org/home-page/](https://ghost.aikyamsolve.org/home-page/)
- Need to create a dummy pages for the examples
- Need to create a dummy pages for the examples
**Page Settings**
**Where to Access Page Settings:**
- Look at the top-right corner of your screen and find the Settings icon.
- Click on the icon to open the Page Settings Panel.
**Page Settings to Adjust:**
1. **URL:** Edit the Page URL if necessary for SEO or clarity.
2. **Publish Date:** Set a future or backdated publishing schedule.
3. **Tags:** Add relevant tags to organize your Page by topic.
4. **Excerpt:** Write a brief summary that will appear in previews.
5. **Authors:** Ensure the correct author is assigned.
**Saving and Publishing
*Facilitator - (check the reference image )*** To publish the Page and page , look at the top-right corner of your screen. You will see a publish button—click on that.

**Step-by-Step Instructions for Saving and Publishing**

- Saving as Draft
- Publishing Immediately
- Scheduling for Later
- Publish Only (Without Email)
- Publish and Email (Notify Subscribers)
- Email Only (Without Publishing)
##### Outcome:-
- Participants will gain the skills to create, format, and publish web pages using Ghost.
- Create and format a page with a title and content.
- Use extra elements like buttons, images, or dividers to enhance the page.
- Understand the difference between posts and pages.
- Gain confidence in using Ghost to create and publish static pages.
---
##### Session 6 :
Explaining Post Settings & Page Settings
##### Theme:
Guide them through how they can access this page settings and post setting.
##### Materials Needs:
- Facilitator’s laptop
- TV screen
##### Methodology
The facilitator has to explain to them how they can access this page settings and post setting.
***Facilitator - (check the reference image )***
To access the page or post settings, look at the top-right corner of your screen. You will see a **settings icon**—click on that. This will open the settings panel where you can adjust things like the title, URL, tags, and other options for your page or post.

**Step by step-**
Click on the setting icon in top right.
- Page URL
- Publish date
- Tags
- Page access
- Excerpt
- Authors
- Template
**Key Differences:**
- Posts use tags and excerpts to organize content pages do not.
- Pages can have different templates and visibility options, suitable for static content.
##### Outcome:-
Understanding of page and post setting.
---
##### Session 7 :
Advance setting for site & Editing the Theme
##### Theme:
Guide them through how they can access this page settings and post setting.
##### Materials Needs:
- Facilitator’s laptop & Participants Laptops
- TV screen
##### Methodology
Teach participants how to change site settings and customise the theme following the steps given below.
***Facilitator - (check the reference image )***
To access the main setting - Open the Ghost dashboard and look at the left menu bar. Scroll down to the bottom, and click on the Settings icon.
**Steps:** *(Ask participants to follow the same steps as you show on screen )*
**1- General Site Settings (15 minutes)**
- **Site Title and Description:-** In the **General** **section**, click **Title & description**. Update the **Site Title** and **Site Description** to describe your site.
- **Meta Data:** Show how to edit **Meta data** (title and description) for search engines to help the site appear in search results.
- **Social Media :** Explain how to add link **Social Media accounts** like facebook and twitter.
- **Language and Timezone :-** Teach how to change the **Language and Timezone** *(if needed this can be skipped).*
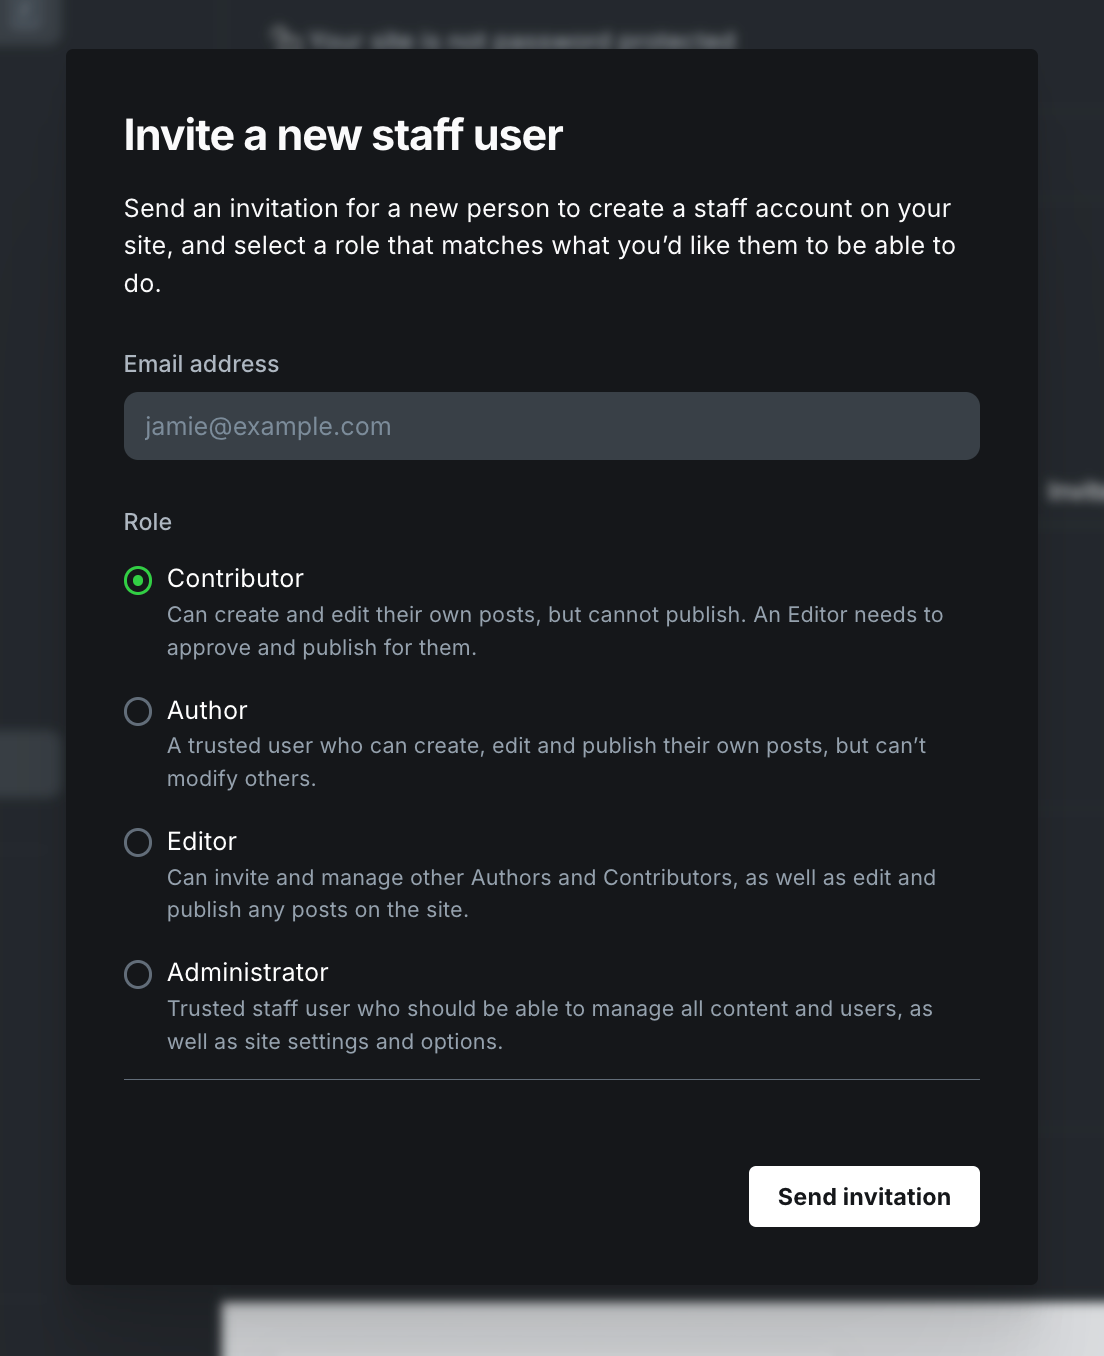
- **Staff:** - Adding Team Members
***Facilitator Instructions: -* **Show participants the Settings > **Staff section**, where they can invite team members by entering their email addresses.
Explain the four roles in Ghost and what permissions each role has:
****
**2- Site Setting**
***Facilitator:-***
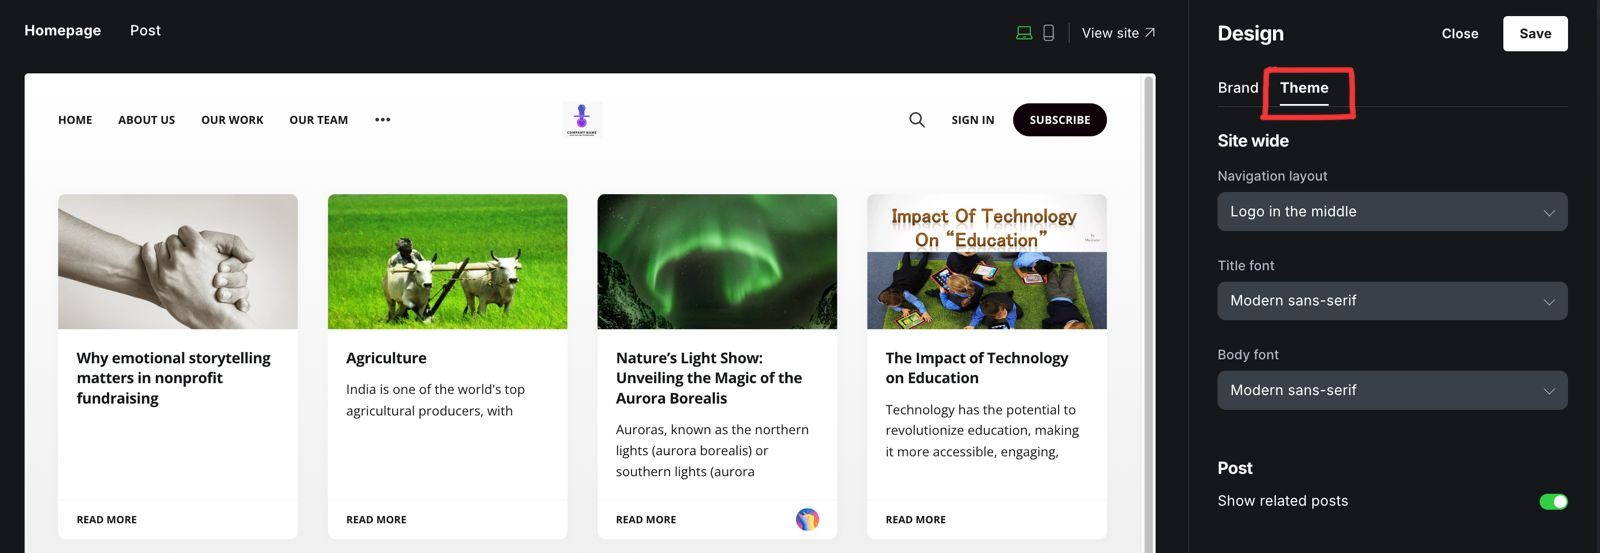
- **Theme:**
- Open the Ghost dashboard.
- Scroll to the bottom of the left menu and click on the **Settings icon.**
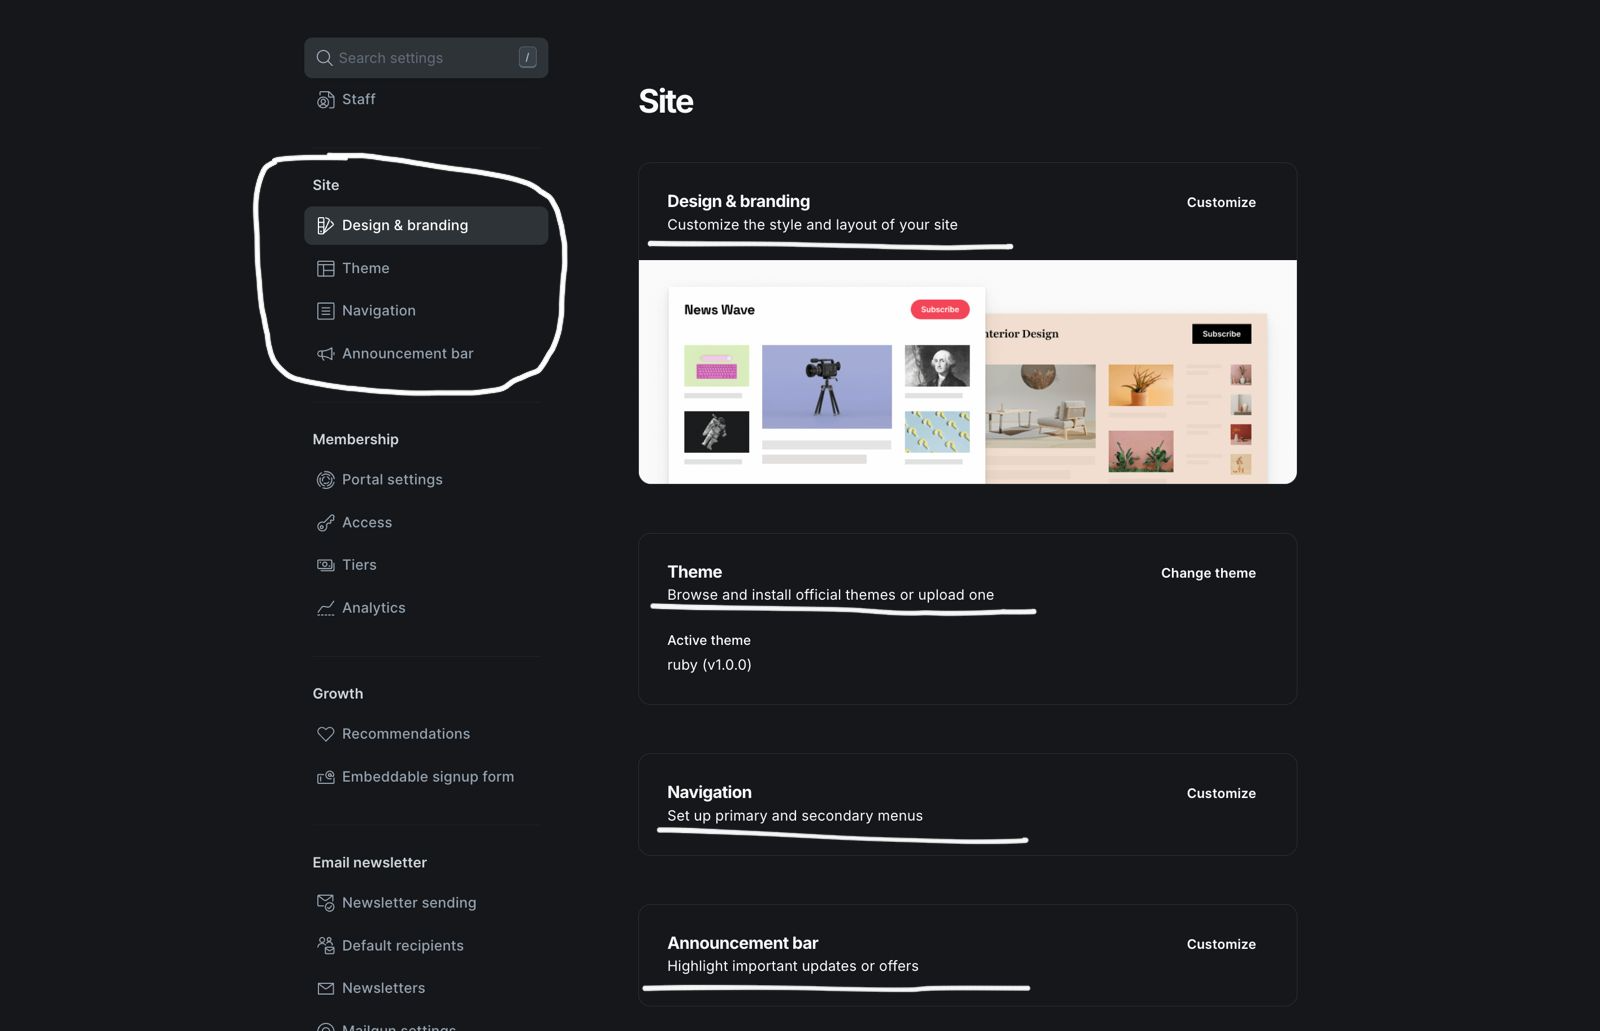
- **Design and Branding:**
show how they can customize the look and feel of your site by adding your logo, changing color, publication cover.
- - **Add your Logo:** Click on the logo section and upload your file.
- **Change the Colors:** Select colors for your site’s branding.
- **Update the Publication Cover:** Upload an image to display as the cover for your homepage or other key pages.
- **Note:- ** Explore the Design Options: Options here depend on the theme you’ve selected. Check for layout or style changes you can customize.
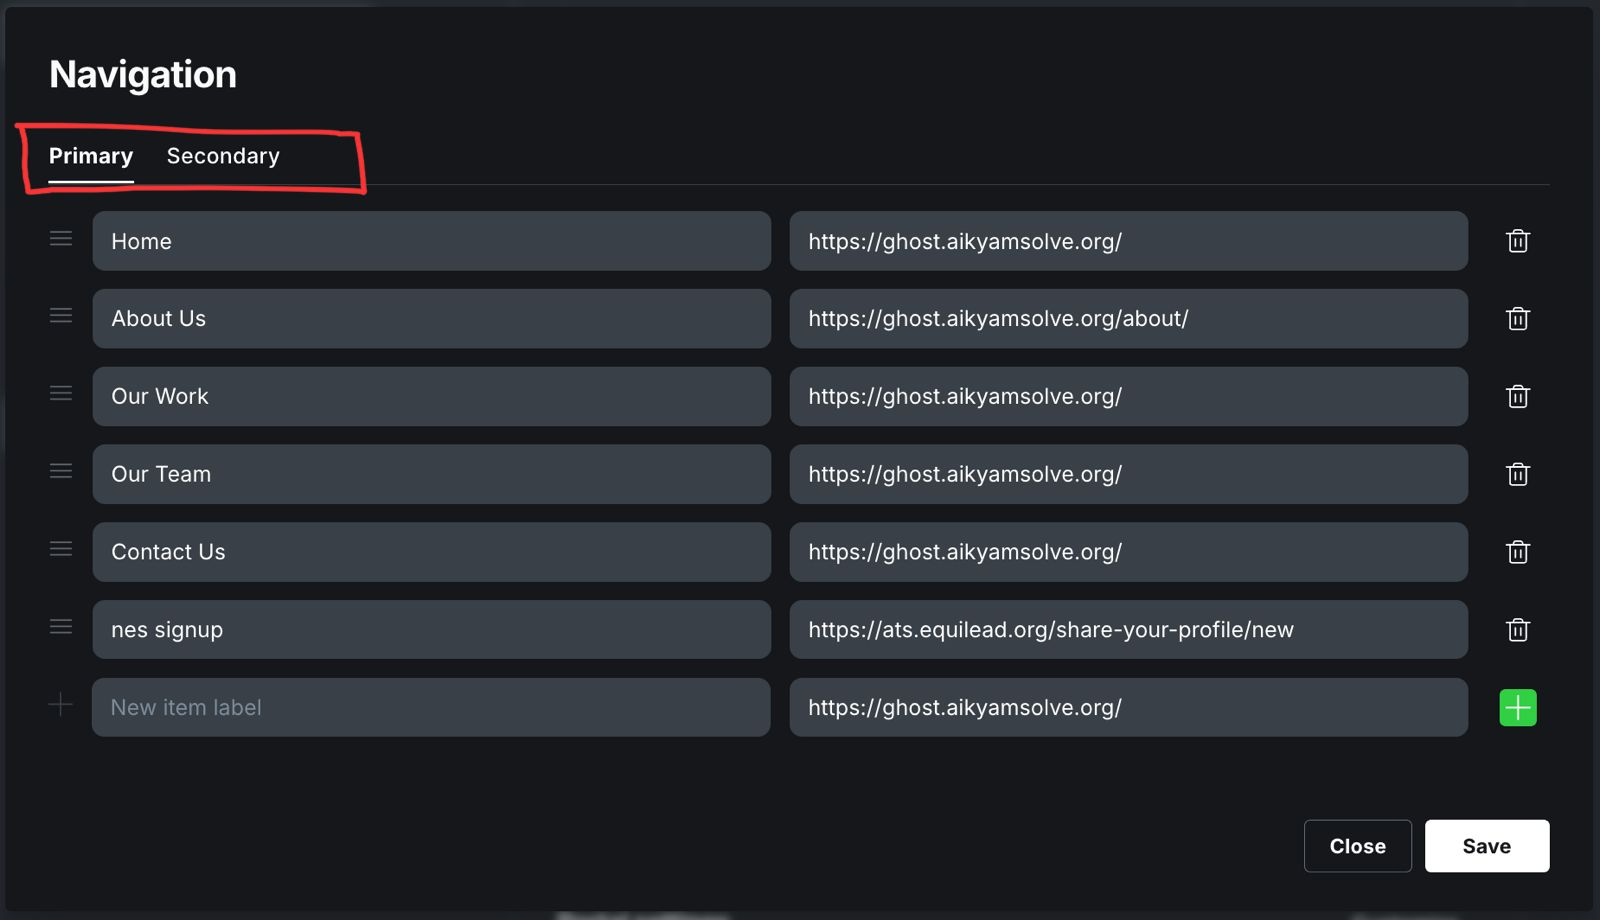
- **Navigation:** Set up your site’s menu and links. This is how visitors will move around your site, so make sure it’s clear and easy to use.
**Go to Navigation in the Settings menu.**
**1- Add Primary Navigation links:**
- These links appear in the header (top of the page).
- Click Add Item, type the name of the link (e.g., “About Us”), and add the URL.
- Save the changes.
**2- Add Secondary Navigation links:**
- These links appear in the footer (bottom of the page).
- Click Add Item, type the name, and add the URL.
- Save the changes.
- **Announcement Bar:** This can be used to add a message at the top of your site. It’s great for sharing important updates, promotions, or announcements with your visitors.
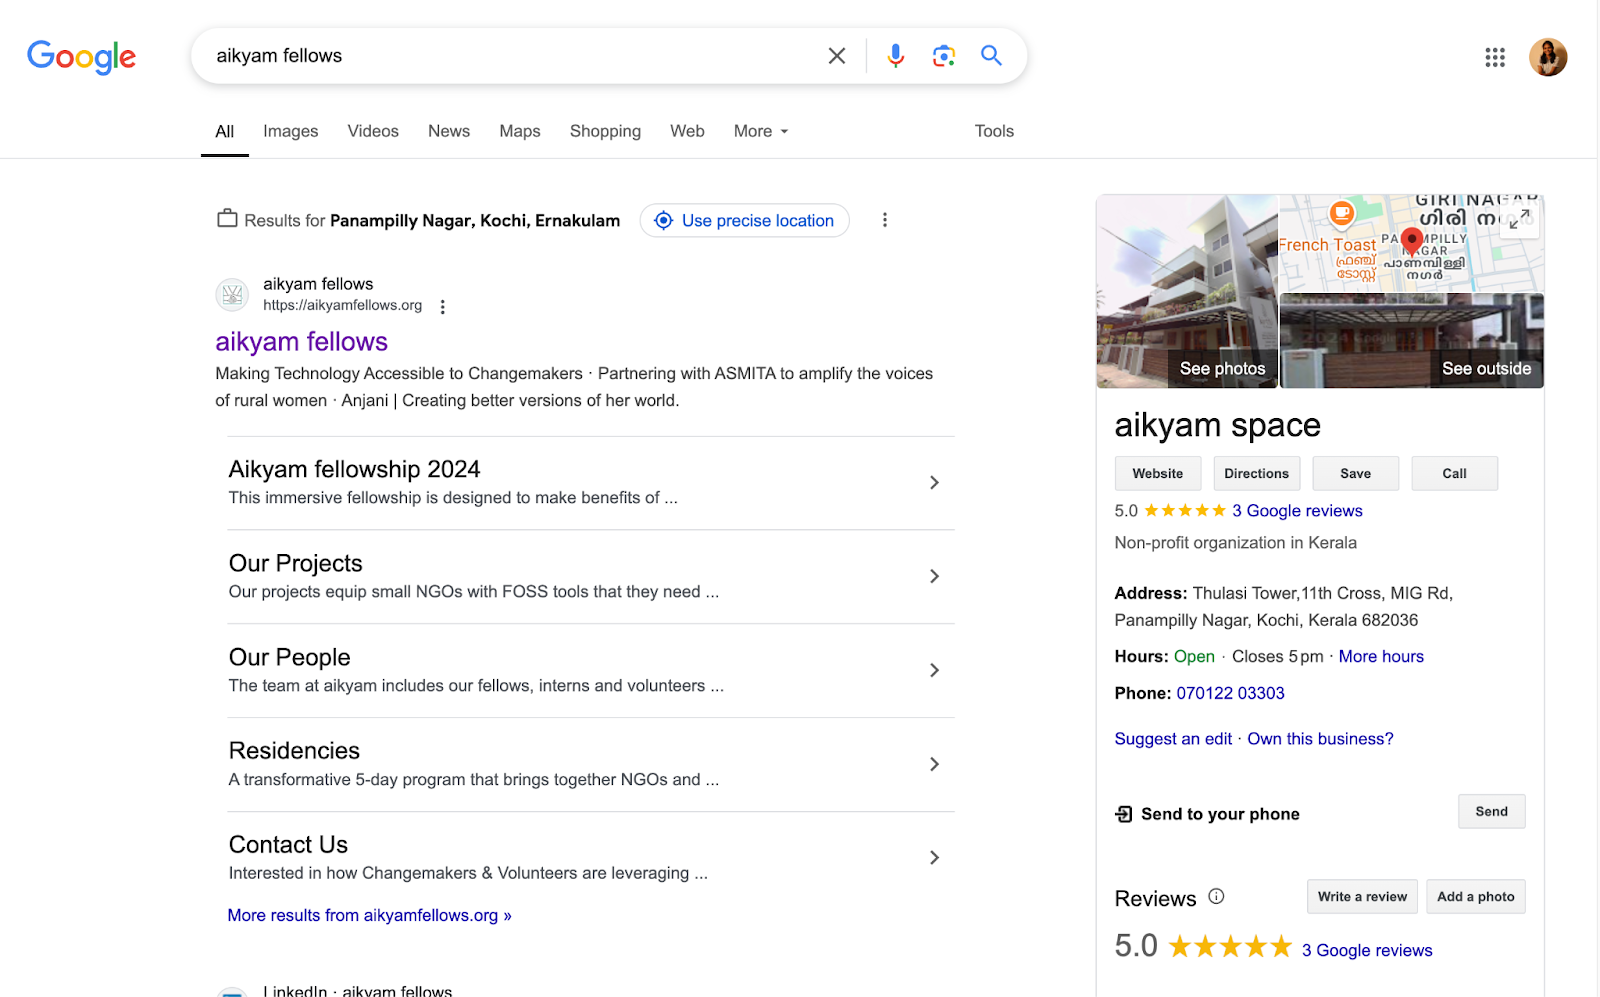
***Example :-*** show the aikyam website and the space website (**[aikyam fellows,](https://aikyamfellows.org/) [aikyam space](https://aikyam.space/)** )
**1- Aikyam fellows** (which is saying**"Residency | Making Storytelling Tools Accessible to NGOs: Apply Now "** )

**2- Aikyam space**

##### Outcome:-
Participants will know how to navigate theme settings to make customizations.
---
##### Session 8 :
Adding Team Members
##### Materials Needs:
- Facilitator’s laptop and TV screen
- Participants’ devices
##### Methodology
**1. Access the Staff Section**
1. Open the Ghost dashboard.
2. Scroll down the left menu bar and click on the **Settings icon**.
3. Select **Staff** from the Settings menu.
**2. Invite a Team Member**
1. In the **Staff** section, click the **Invite people** button.
2. Enter the team member’s **email address.**
3. Choose their **role** from the dropdown menu (Admin, Editor, Author, Contributor).
4. Click **Send Invitation** to send the invite.

##### Outcome:-
Participants will be able to add team members, assign roles, and understand the permissions each role has for collaboration.
---
##### Session 9 :
Managing SEO
##### Theme:
Introduce participants to basic SEO settings for their posts and pages.
##### Materials Needs:
- Facilitator’s laptop and TV screen
- Participants’ devices
##### Methodology
***Facilitator Instructions:*** Show how to add meta descriptions, tags, and other SEO-related settings within the post editor and also in site settings.
**Manage SEO in Ghost:**
**For Posts and Pages**
- Open the **Ghost Editor** for a post or page.
- Click the **Settings Icon** in the top-right corner.
- In the Post/Page Settings panel, find the **Meta Data section**.
- **Add a Meta Title**: Write a descriptive title (different from the post title if necessary).
- **Add a Meta Description**: Write a short summary (under 155 characters) explaining what the post/page is about.
- Save changes by clicking **Update or Publish**.
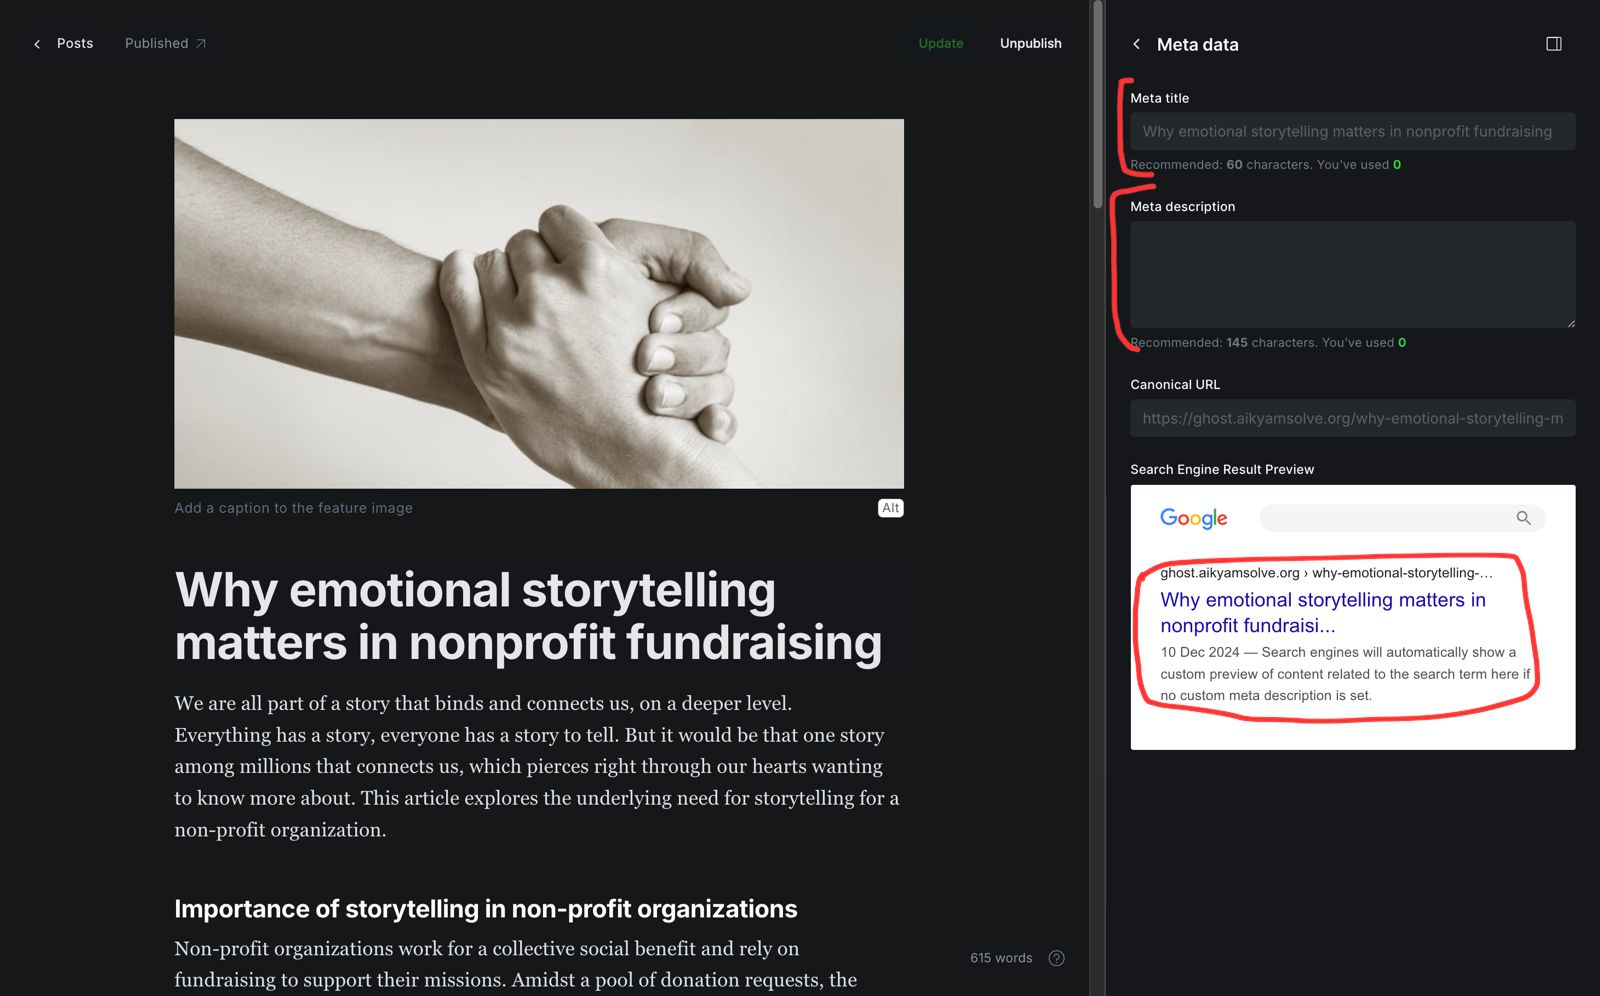
**Why are Meta Descriptions, Tags, and SEO Settings Important?**
Meta descriptions, tags, and SEO settings help your site rank higher on search engines like Google. They make it easier for people to find your posts or pages when they search for relevant topics.
1. **Meta Descriptions:-** A short summary of your post or page that appears in search results. It gives users a quick idea of what the page is about.
2. **Site SEO Settings:-** These allow you to fine-tune how your site appears in search results, improving visibility and helping more visitors find your content.
Setting these up properly improves the chances that your audience will discover your content through search engines.
##### Outcome:-
Participants will understand basic SEO settings in Ghost to improve visibility.
---