Tools for Storytelling Residency Coursework
Covers the basics of stakeholder needs mapping, levels of impact storytelling and helps participants think through a content strategy and plan. Also goes into the details of using Ghost as the tech tool that can be leveraged for impact storytelling.
- Module 1 | Levels of impact storytelling
- Module 2 | Know your audience & their needs
- Module 3 | Introduction to Ghost
- Module 4 | Reach out to your audience
- Module 5 | Understand audience behaviour through analytics
- Module 6 | No-stress ways to write better
Module 1 | Levels of impact storytelling
Session 0
30 minutes - 1 hour, depending on cohort size
Theme
Listening with intent
Materials needed
None
Methodology
- Establish why intentionally listening is important.
- What is a conversation? A conversation is a talk between two or more people where news, thoughts and ideas are exchanged. There was a time when conversations only happened face to face. We have now moved away from that mode of conversation to conversations that are taking place all the time, on different apps, through calls, text, video calls, etc. Explain how conversations have gone from an act of both talking and listening to people talking without really listening.
Note to facilitator: You can use examples of the old string cup-telephone toy or the walkie-talkie to talk about this. With the example of the walkie-talkie, for instance, only one person can speak at a time while the other person listens. Only once the person talking finishes and says, Over, can the other person start talking.
[illustration of people speaking into walkie-talkie to be added]
Now, people are so busy reacting to things or getting ready to react or respond even as they are reading texts and emails that there is no real listening.
- Listening is important. Listening with intent, empathy.
This builds trust, helps you deeply understand the other's experiences and perspectives, builds better relationships, and perhaps, most importantly, creates a safe space for honest communication because it shows that the listener cares for and respects the other person's experiences and concerns. This is very important in life, particularly in the impact work that we do.
Note to facilitator: You may bring in examples from your experience to reinforce this concept, if needed. A common example to use: Activist Kamala Bhasin's experience with communities in Rajasthan, when she was trying to build a literacy centre for a community whose real need was water; she talks about the importance of listening to the communities you are working for (quick watch: https://youtu.be/m9taRE-IPsk?si=N30G6rM2qmD6MknP) - The next activity is an exercise in active listening. Reinforce the idea that listening with intent is learned by practice and we can practise this every day in our conversations with colleagues, friends, family, etc.
- Split up the cohort into groups of two each. Each team gets 15 minutes for the participants to get introduced to each other.
Then they have to come back and introduce the other person to the group.
- Instructions for the introduction:- In the first five minutes, one person asks their partner questions to know more about them, and allows them to speak as much as they want to. The first person's job then is to listen carefully. No taking notes or anything. Just active listening.
- In the next five minutes, the roles are reversed.
- They have five minutes for follow-up questions and to gather back at the table.
- Each person then has to introduce their partner to the rest of the group, in under 2 minutes.
- Instructions for the introduction:- In the first five minutes, one person asks their partner questions to know more about them, and allows them to speak as much as they want to. The first person's job then is to listen carefully. No taking notes or anything. Just active listening.
- Wrap up the session by asking feedback on how it felt to listen, any challenges faced.
Learning outcomes
- Understanding that listening with intent, empathy is a skill that can be learned.
- Understanding that this is a skill that will come in extremely handy when working in social impact.
Session 1
1.5 hours
Theme
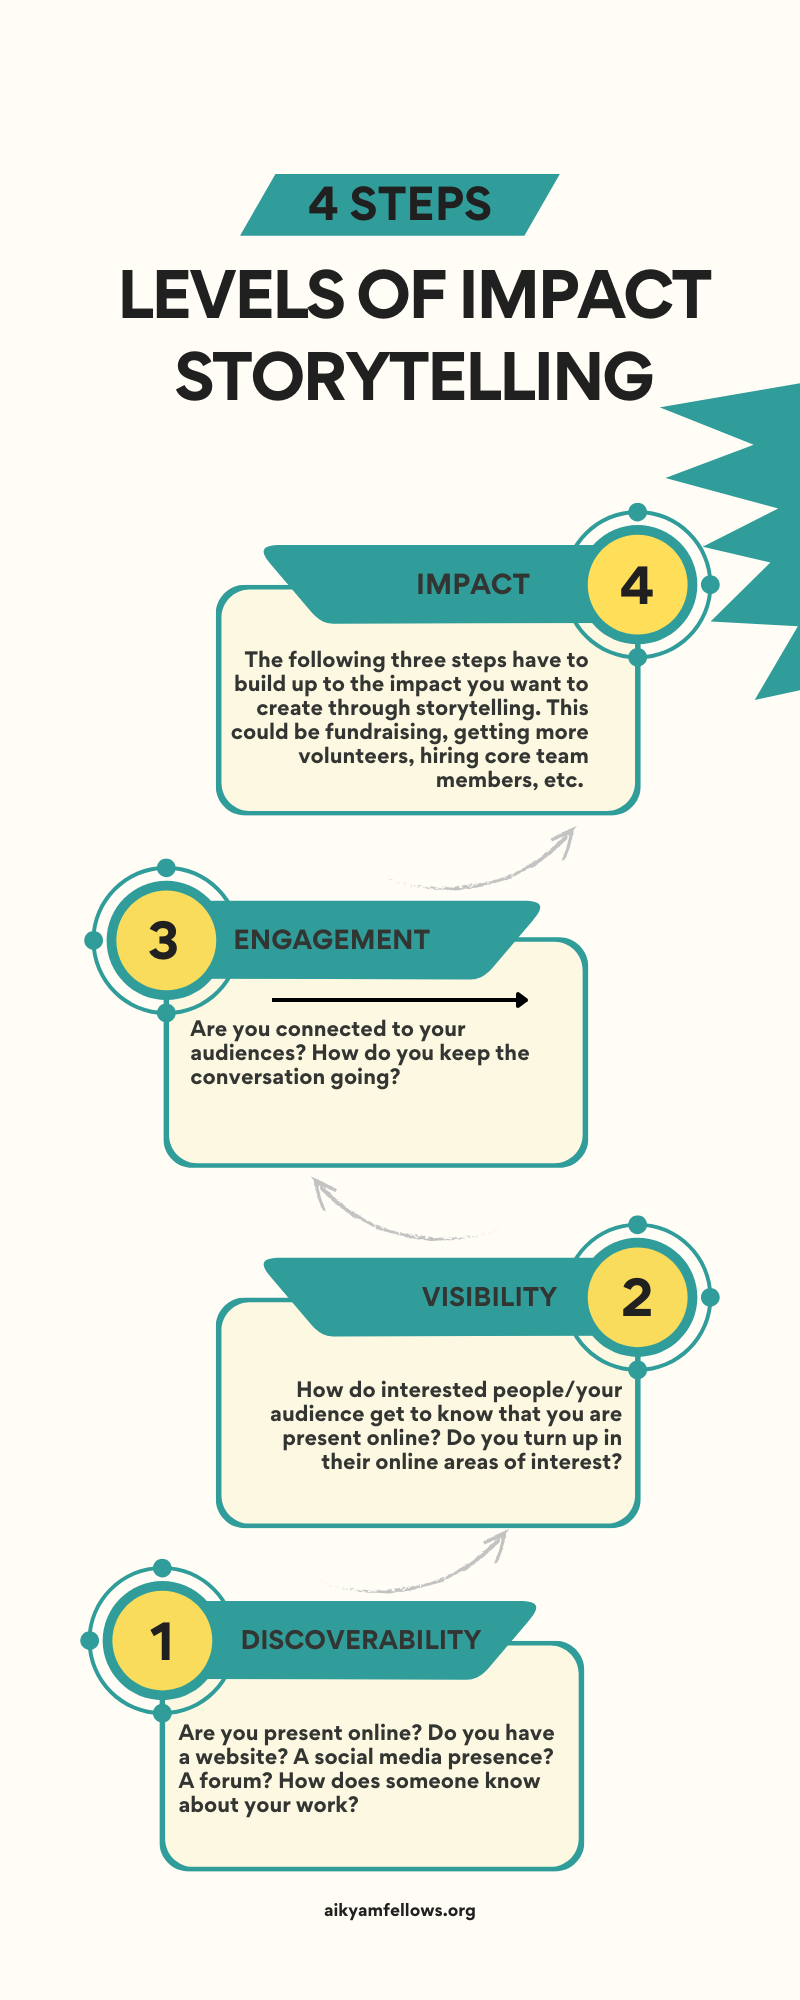
Four levels of impact storytelling, from discoverability to visibility and engagement to impact.
Materials needed
Whiteboard and marker
OR
Chart paper and pen
Methodology
Ground rules to set for all sessions:
- Bring only the devices you need to the session. Note to facilitator: Explain here what is needed for this particular session
- Mute mobile phones before you put them away
- Encourage the participants to take space and make space. To take up space is to speak up and participate actively in discussions and putting their ideas and perspectives across. It is equally important to make space for others to do the same. Note to facilitators: Ensure you check in about this throughout the sessions, especially by making space for those who are not used to taking up space or struggling to do so.
- This is a safe space, and we encourage everyone to check their privilege and ensure that we do not discriminate in speech or action.
- Do remember there are no right or wrong answers. Note to facilitator: Repeating this during the sessions and activities helps participants speak up more freely.
- In this module, the cohort learns about the different levels of impact storytelling. We are primarily looking at impact storytelling online in this exercise, because our residency will give you the tools you need to do exactly this.
- Let's take the example of a university. Ask open questions about what a university needs in order to run. Allow participants to answer individually, and discuss these answers for 5-7 minutes. Note to facilitator: Your objective is to guide the team towards establishing that the bare minimum factors (let's introduce the word stakeholders here) the university needs to run/fulfil its purpose are students and teachers.
- Ask the participants to openly discuss what could possibly be the best ways to reach out to students and teachers. Note to facilitator: Let the cohort discuss this as freely as needed. Give them 5-7 minutes. Our objective is to gently guide the cohort into understanding that the website is one of the best mediums for reaching out to students, teachers and parents. You can use examples like: even if you see a flyer for a new product, what is the first thing you do? Which will most likely lead to the answer: look it up online or google it. Guide them to this answer, if needed.
- Establish why having a website is the first step. That is, discoverability. Which is, simply being discoverable online. Note to facilitator: Start drawing the Levels of Impact Storytelling ladder on a chart paper or whiteboard, with Discoverability as the first step, L1.
- Ask the cohort questions like, 'How will people know that the website exists?', 'If the school wants to make a hiring announcement, what happens after the JD is put up on the website?', 'What should the school do to ensure more people see the JD?'
Note to the facilitator: Use the answers to build up to the concept of Visibility. Which is, making the website visible to a larger audience, which should include your target audience. Add Visibility to the ladder as L2. - Give an example about a JD for a math teacher, that lists experience and all details except for expected salary. Explain the concept of Engagement when potential candidates comment on the post asking for more details, or asking whom they can contact for more details.
Ask the cohort what should be done in this case.
Note to facilitator: Give 5-7 minutes for the answers to come in. Answers will vary from responding to each participant individually, to updating the social media post, to updating the job posting on the website, etc. Write Engagement as L3 in the ladder. And explain how important is to stay connected to your audience that is already interested in what you are sharing. - Also use this example to show how levels are interconnected. Explain how the comments on the post point to a lack of detail in the JD, which means one has to go back to L1 level (updating the JD with all details)
- Explain how doing L1, L2, and L3 consistently leads to L4, Impact; in this case, hiring the right faculty.
Note to facilitator: You can also ask questions to explain this point further. For instance, ask about a new course being introduced. You can ask the participants questions around what the impact should be, how to build towards that impact (what are the steps to follow), etc. - General note to facilitator around common queries/FAQs:
- Our residency is about the impact of online storytelling, which is why our focus in this exercise has been about the website.
- Reiterate that often, NGOs know what their impact needs to be. For example, it could be fundraising. An NGO wants to raise funds and has added a donate button on the website, but no one is donating. This is because there is no shortcut to L4, the impact level. You have to build through L1, L2 and L3 consistently: the stories that encourage people to donate should be on the website, these stories should be circulated among potential donors, and they have to be kept engaged. Without that, donations won't keep coming in. - Do a check-in session where participants are encouraged to put up a sticky note with how they are feeling after this session. Guidelines for feedback:
- Do not use words like good, bad, ok, fine, but 'feeling' words like curious, excited, nervous, etc.
- Those who like to draw can illustrate the way they are feeling
- They can choose to compare it to the weather: stormy, sunny, sunny with a hint of clouds
- Participants can put these up anonymously but those who want to talk about how they are feeling may be encouraged to do so.
Learning outcomes
- Introduction to the idea that there are different levels of storytelling
- Understanding why each level is important, and how they are all interconnected and important.
- Understanding why the work on each level has to be consistent to achieve impact.
Module 2 | Know your audience & their needs
Session 1
2 hours
Theme
Thinking through stakeholder and needs mapping
Materials needed
For the participants: Cards, sketch pens, sticky notes
For the facilitator: Whiteboard or chart papers, marker/sketch pen
Methodology
Ground rules to set for all sessions:
- Bring only the devices you need to the session. Note to facilitator: Explain here what is needed for this particular session
- Mute mobile phones before you put them away
- Encourage the participants to take space and make space. To take up space is to speak up and participate actively in discussions and putting their ideas and perspectives across. It is equally important to make space for others to do the same. Note to facilitators: Ensure you check in about this throughout the sessions, especially by making space for those who are not used to taking up space or struggling to do so.
- This is a safe space, and we encourage everyone to check their privilege and ensure that we do not discriminate in speech or action.
- Do remember there are no right or wrong answers. Note to facilitator: Repeating this during the sessions and activities helps participants speak up more freely.
- Divide the cohort into teams of 2-3 members each. Each team can choose their own names. It is best to separate members from the same organisation into different teams. Explain that there will be team activities throughout the workshop.
- Use the same example from the previous module, of the university. Each team may use cards, sticky notes and sketch pens for their activity.
- Invite each team to think through who could be the different stakeholders for the university. You may allot 15-20 minutes for this activity.
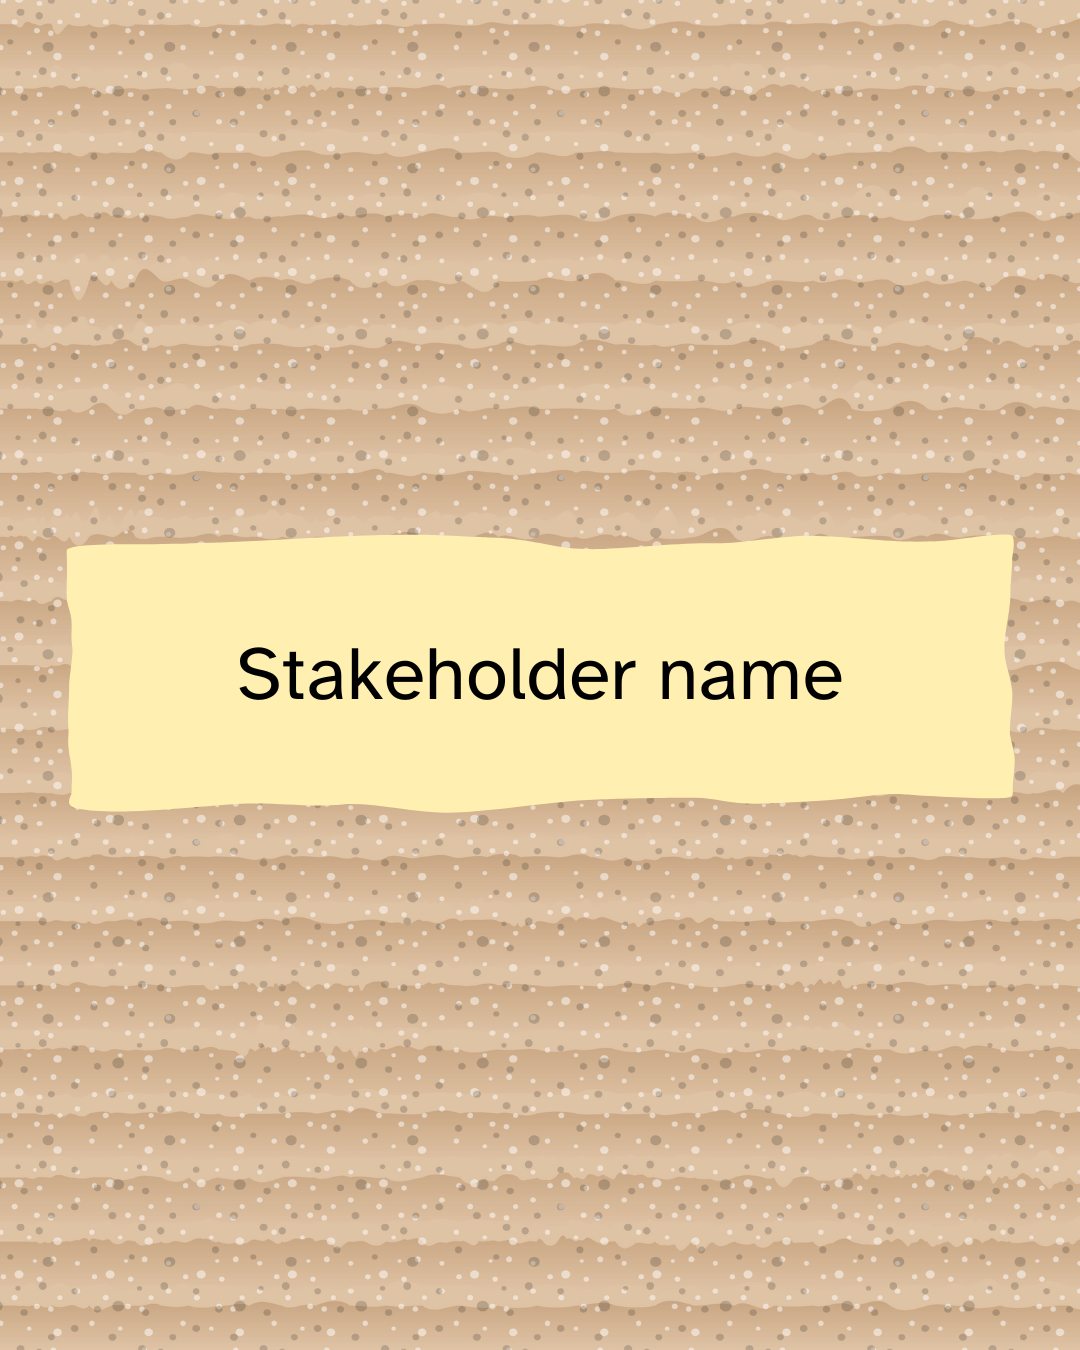
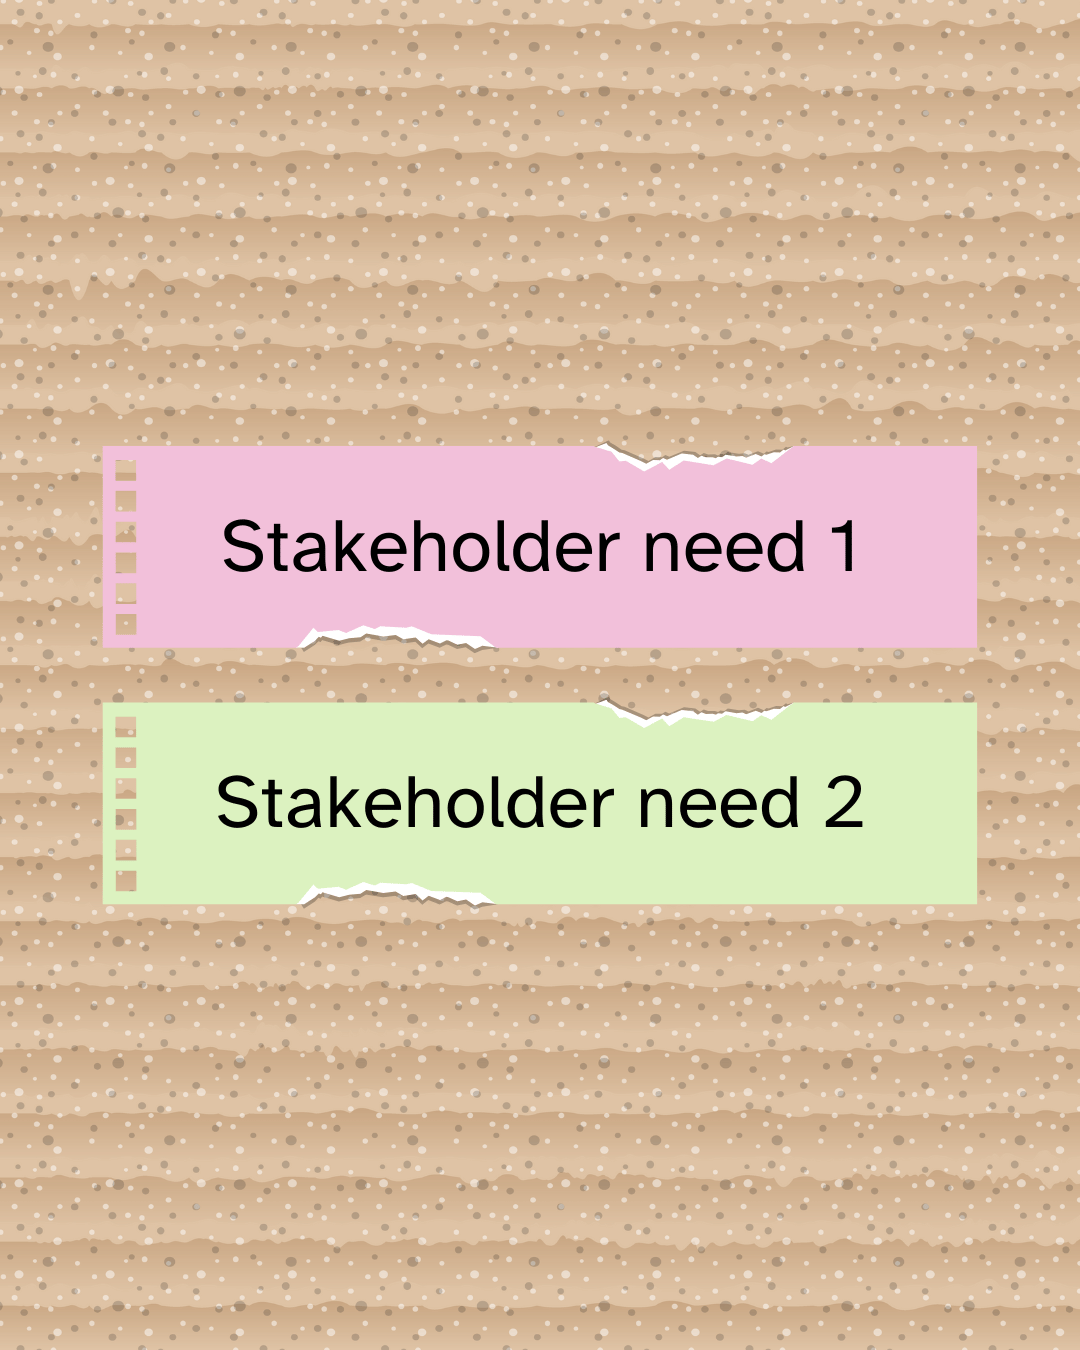
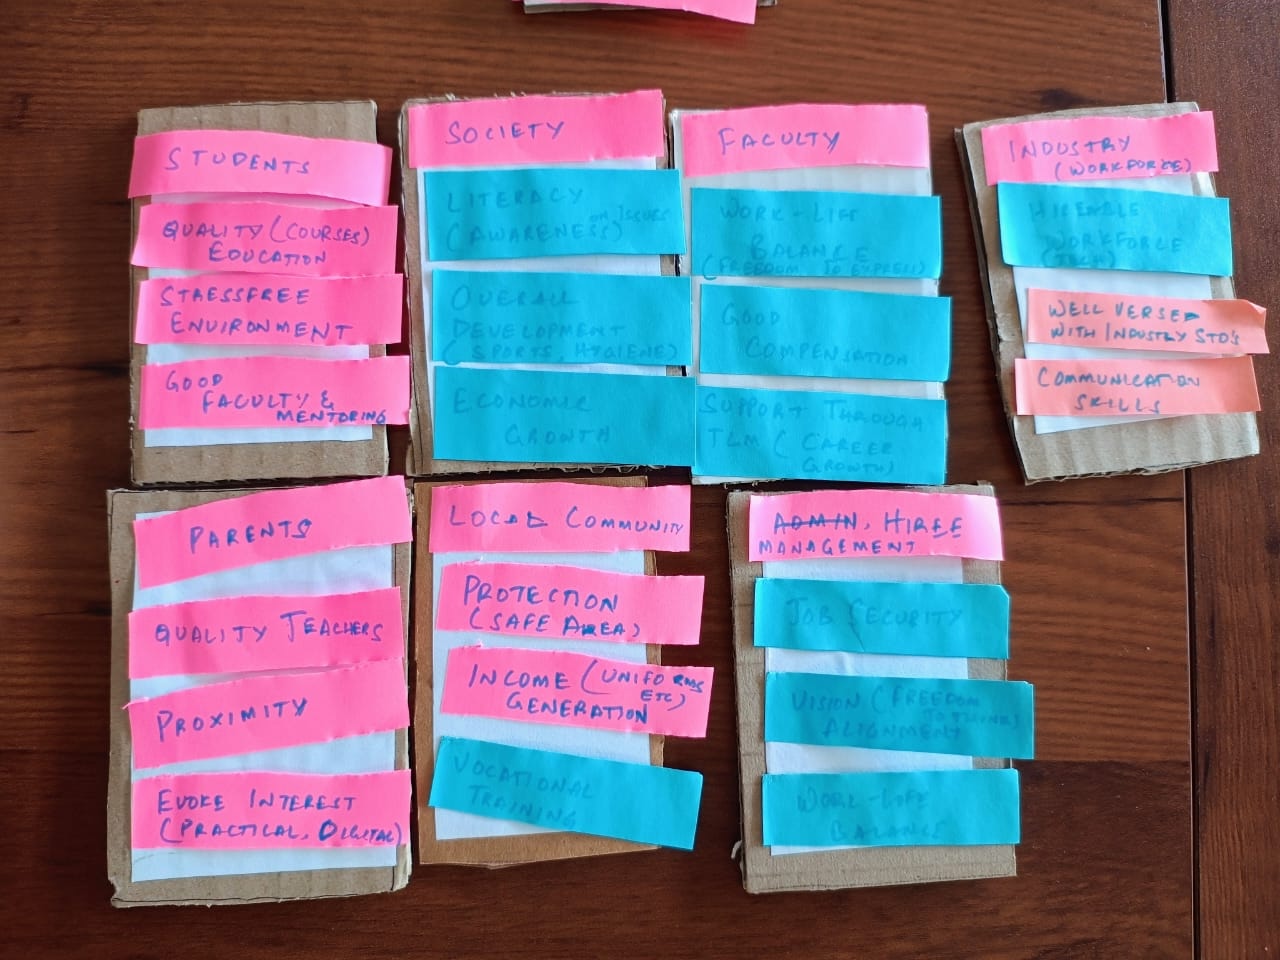
Ask each team to list out the stakeholders on a sticky note and attach it to a card. They can then list out 2 stakeholder needs on sticky notes and place it on a card under the stakeholder card. This will look like this: 1 card with stakeholder name sticky note > 1 needs card related to the stakeholder with 2 needs on sticky notes.

Note to facilitator: Often, you will see that teams get straight to writing without discussing. You may remind them of the importance to discuss and listen to each other, before coming to a consensus on stakeholders and the most important needs to put on the sticky notes. - Each team presents the cards with the names and needs of stakeholders. Facilitator can choose one card from each team for all the the common stakeholders and needs mentioned; for instance, students/teachers/school management/support staff. If any team has come up with a stakeholder not mentioned by any other team, this can be kept separately.


- Once you have a card with needs for each of the stakeholders, read out the names of the stakeholders and their needs mentioned on the first stakeholder card in front of you. If any team has needs for that stakeholder that have not been mentioned in the ones read out, collect that sticky note from that team and add it to your needs card. Go through this exercise with each of the stakeholder cards.
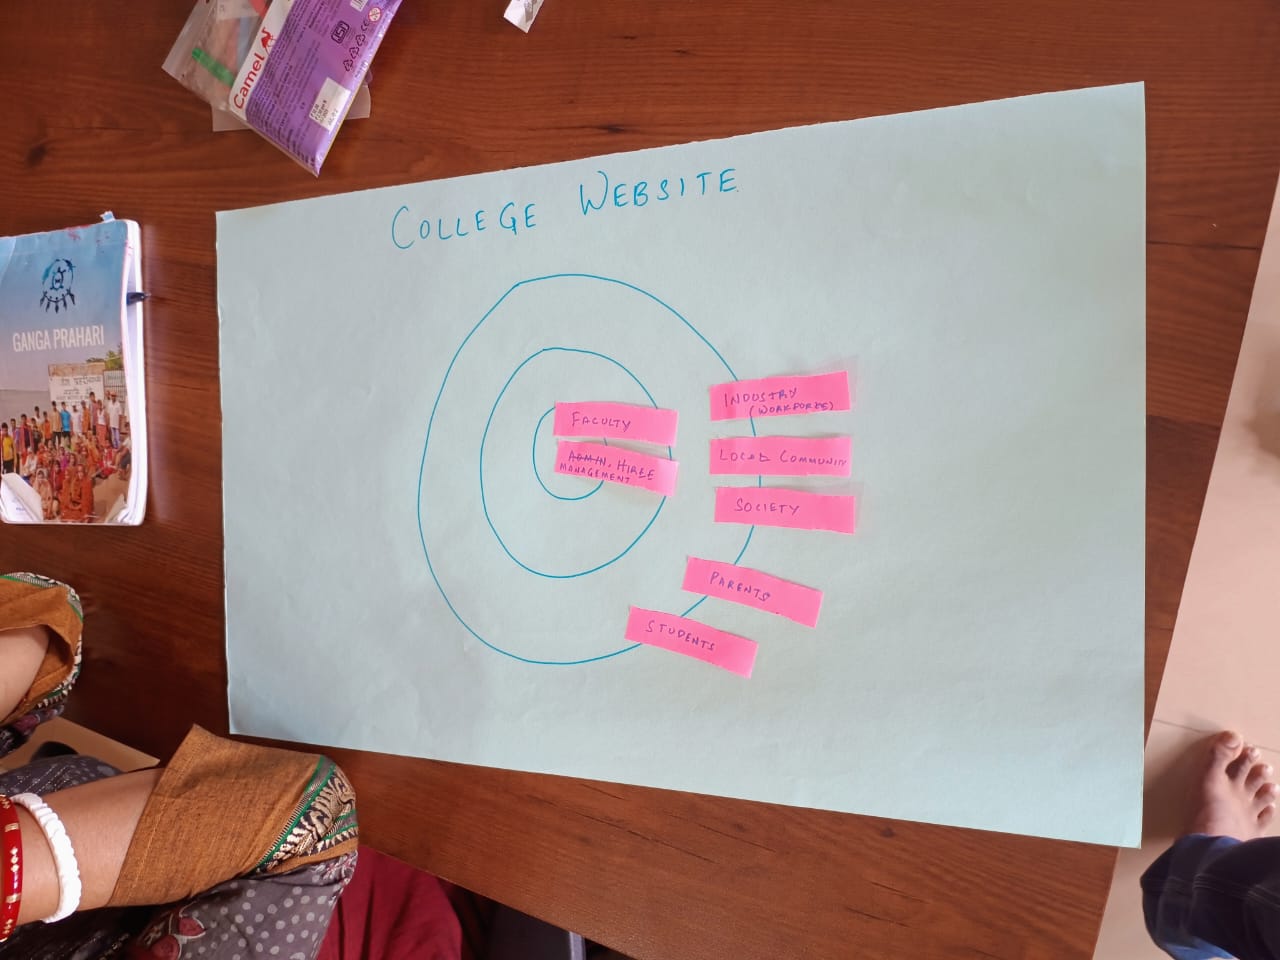
- Once all the stakeholder cards and needs have been sorted, ask the teams to gather around a whiteboard/large chart paper, with concentric circles drawn on it. Let the teams stand up and take a look at the stakeholder + needs cards. Give them a couple of minutes to go through this. Encourage them to ask questions to clarify doubts.
- Explain how there are so many stakeholders for the university, but there will be one or two key stakeholders without whom the university cannot function or its purpose cannot be fulfilled. Invite the cohort to suggest who could be the primary stakeholder in this case. Participants may need help/prompting in thinking this through.
Let the participants place that stakeholder sticky note in the centre of the circles in the chart. Ask participants who the next key stakeholder could be. They place that stakeholder sticky note in the next circle. Similarly, let them arrange all stakeholders in the concentric circles, with the secondary stakeholders moving towards the outer circle. - You can use this to explain to them clearly who are the primary stakeholders and the secondary stakeholders. Essentially, in this example, the primary stakeholders are the ones the university just cannot function without/fulfill its basic purpose. Secondary stakeholders are more like enablers who may be essential for this process to happen, but the primary purpose of imparting education can happen with just two stakeholders: students and teachers/professor.
- Ask the participants to take a look at the circles and placement of cards to fully understand who are the primary and secondary stakeholders. Tell the teams they can move the stakeholders closer to the centre of the circle or further away, depending on their involvement in fulfilling the university's purpose.
Give the participants 2 minutes to come to an agreement on all the sticky note placements. Once they are done, ask the to take a final look at the chartpaper/whiteboard.
Note to facilitator: Example from a workshop below. Participants sometimes also choose to place the stakeholders at varying distances from the centre of the circle to indicate their importance. You may also encourage them to think this way.
The participants have now mapped the primary and secondary stakeholders. - On a whiteboard/chart paper, draw a four-quadrant graph for decision-making, with Power on the X axis and Impact on the Y axis. Give it the title, Decision-making. Explain to the participants that each of these quadrants represents the ratio of the power to make a decision related to the university to the direct impact of that decision on their lives.

- Allow teams to discuss and suggest where each of the stakeholders will find a place on the graph. They can place the stakeholder sticky notes on this chart accordingly.
Note to facilitator: You may need 15 minutes or so for this. Ask the participants to discuss each stakeholder and come to a consensus before placing the sticky note on the graph. Do also note that the participants may be a little confused when it comes to the impact of the decision, especially for stakeholders like parents and management. Your objective is to gently guide them to see that students and teachers have the least power and highest impact even though they are the primary stakeholders, and the management holds the most power and faces the least direct impact of decision-making. - Let the participants have a short discussion (5-7 minutes) on making decision-making more accessible to and inclusive of primary stakeholders. Explain to them that being able to move primary stakeholders from low power/high impact to the quadrant on the top right will achieve better outcomes overall for all stakeholders.

Learning outcomes
- Understanding how to figure out the key stakeholders for different use cases
- Understanding the impact of decision-making, and the idea that the key stakeholders need more power in decision-making
Session 2
1 hour
Theme
Thinking through key stakeholders for the website
Materials needed
For the participants: Sketch pens, chart paper
For the facilitator: Existing stakeholder cards and needs cards
Methodology
Ground rules to set for all sessions:
- Bring only the devices you need to the session. Note to facilitator: Explain here what is needed for this particular session
- Mute mobile phones before you put them away
- Encourage the participants to take space and make space. To take up space is to speak up and participate actively in discussions and putting their ideas and perspectives across. It is equally important to make space for others to do the same. Note to facilitators: Ensure you check in about this throughout the sessions, especially by making space for those who are not used to taking up space or struggling to do so.
- This is a safe space, and we encourage everyone to check their privilege and ensure that we do not discriminate in speech or action.
- Do remember there are no right or wrong answers. Note to facilitator: Repeating this during the sessions and activities helps participants speak up more freely.
- Place the stakeholder and needs cards from the first session on the table.

All participants have to gather into their assigned teams. Ask teams to suggest who they think is the one primary stakeholder for the university's website.
- What if the objective of the website is to hire qualified faculty for a couple of departments. Who could the primary stakeholder be in this case? - Help them understand why key stakeholders for the website may be different from the key stakeholders for the university, depending on the university's objective at the time for the website.
- Take the participants through how this is often the case for NGO/changemaker websites.
An NGO's primary stakeholder usually includes the grassroots communities or the beneficiaries they work with. However, the NGO's website is not really useful for these communities. Nor is it meant to connect to them; the connection with the primary stakeholders for the NGO is the work the NGO actually does. The website is often created for other needs like fundraising, hiring, connecting with partner NGOs, etc. So the primary stakeholder of an NGO's website is most often funders/donors and potential volunteers/core team members. - Pause for questions here.
- Bring the teams back to the activity at hand.
They now have the university's stakeholders and their needs listed in front of them, on the cards.
- Ask each team to think through who could be the university website's key stakeholders, if hiring qualified faculty is one of their top needs at the moment.
- Each team is free to discuss and choose one more top need.
- Each team has to discuss and present what the website's home page on a chart paper should look like to represent the top two needs. - Homework: Participants to think through who are the key stakeholders for their projects (websites, other storytelling projects) and what their needs are. Write it down and bring to the next session.
- Do a check-in session where participants are encouraged to put up a sticky note with how they are feeling after this session. Guidelines for feedback:
- Do not use words like good, bad, ok, fine, but 'feeling' words like curious, excited, nervous, etc.
- Those who like to draw can illustrate the way they are feeling
- They can choose to compare it to the weather: stormy, sunny, sunny with a hint of clouds
- Participants can put these up anonymously but those who want to talk about how they are feeling may be encouraged to do so.
Learning outcomes
- Understanding that key stakeholders and their needs for the website are unique, and may differ from the NGO's key stakeholders
- Applying this learning to their own projects
Module 3 | Introduction to Ghost
Session 1
1 hour
Theme
Understanding the characteristics of a good website
Materials needed
For the participants: Sticky notes, cards and sketch pens
For the facilitator: Sticky notes and sketch pens
Methodology
Ground rules to set for all sessions:
- Bring only the devices you need to the session. Note to facilitator: Explain here what is needed for this particular session
- Mute mobile phones before you put them away
- Encourage the participants to take space and make space. To take up space is to speak up and participate actively in discussions and putting their ideas and perspectives across. It is equally important to make space for others to do the same. Note to facilitators: Ensure you check in about this throughout the sessions, especially by making space for those who are not used to taking up space or struggling to do so.
- This is a safe space, and we encourage everyone to check their privilege and ensure that we do not discriminate in speech or action.
- Do remember there are no right or wrong answers. Note to facilitator: Repeating this during the sessions and activities helps participants speak up more freely.
- Check in if all the participants have thought through the key stakeholders for their projects, as well as their needs. Participants can take turns to describe their individual project stakeholders and needs.
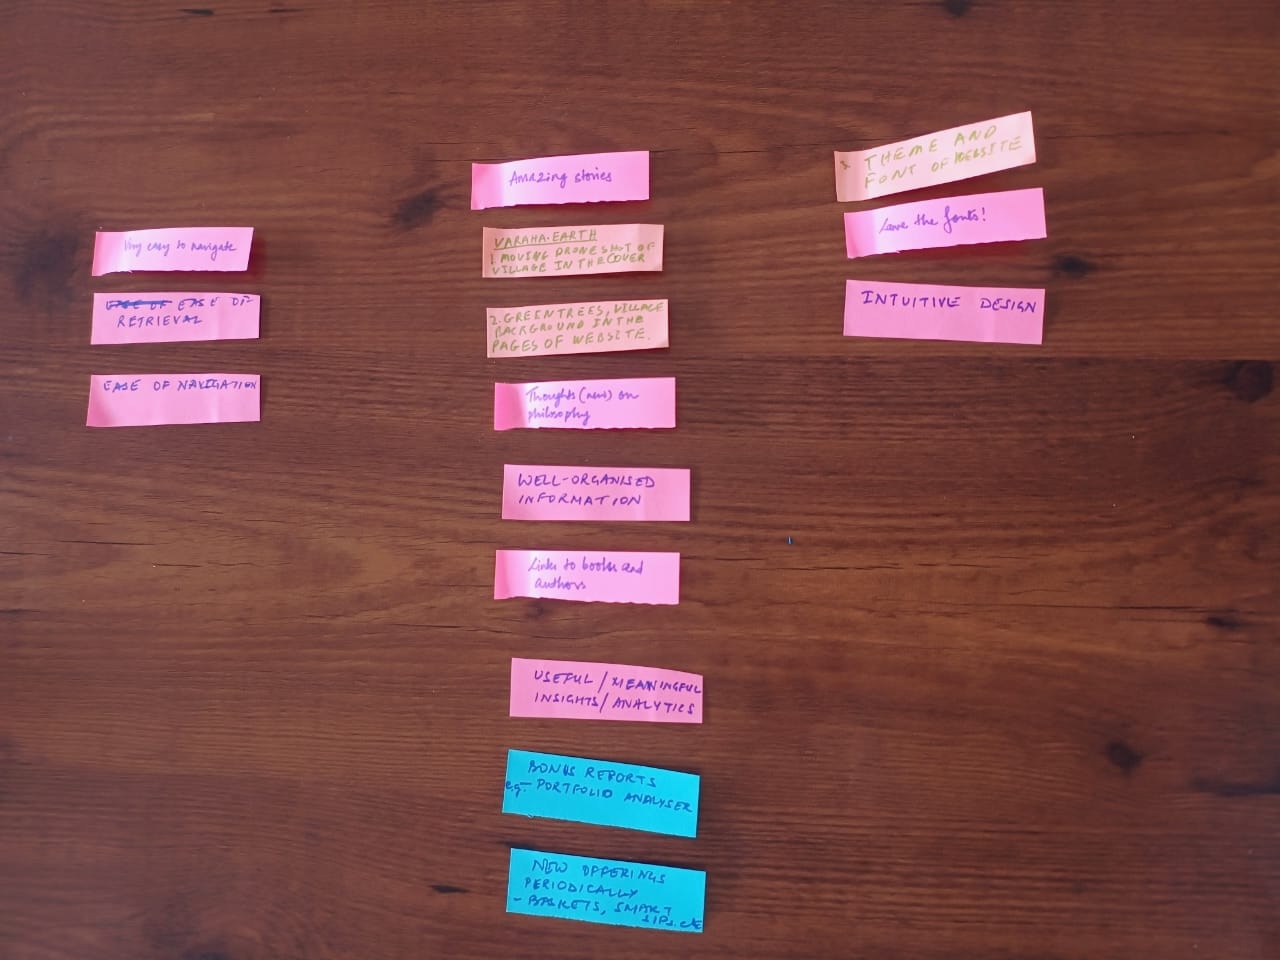
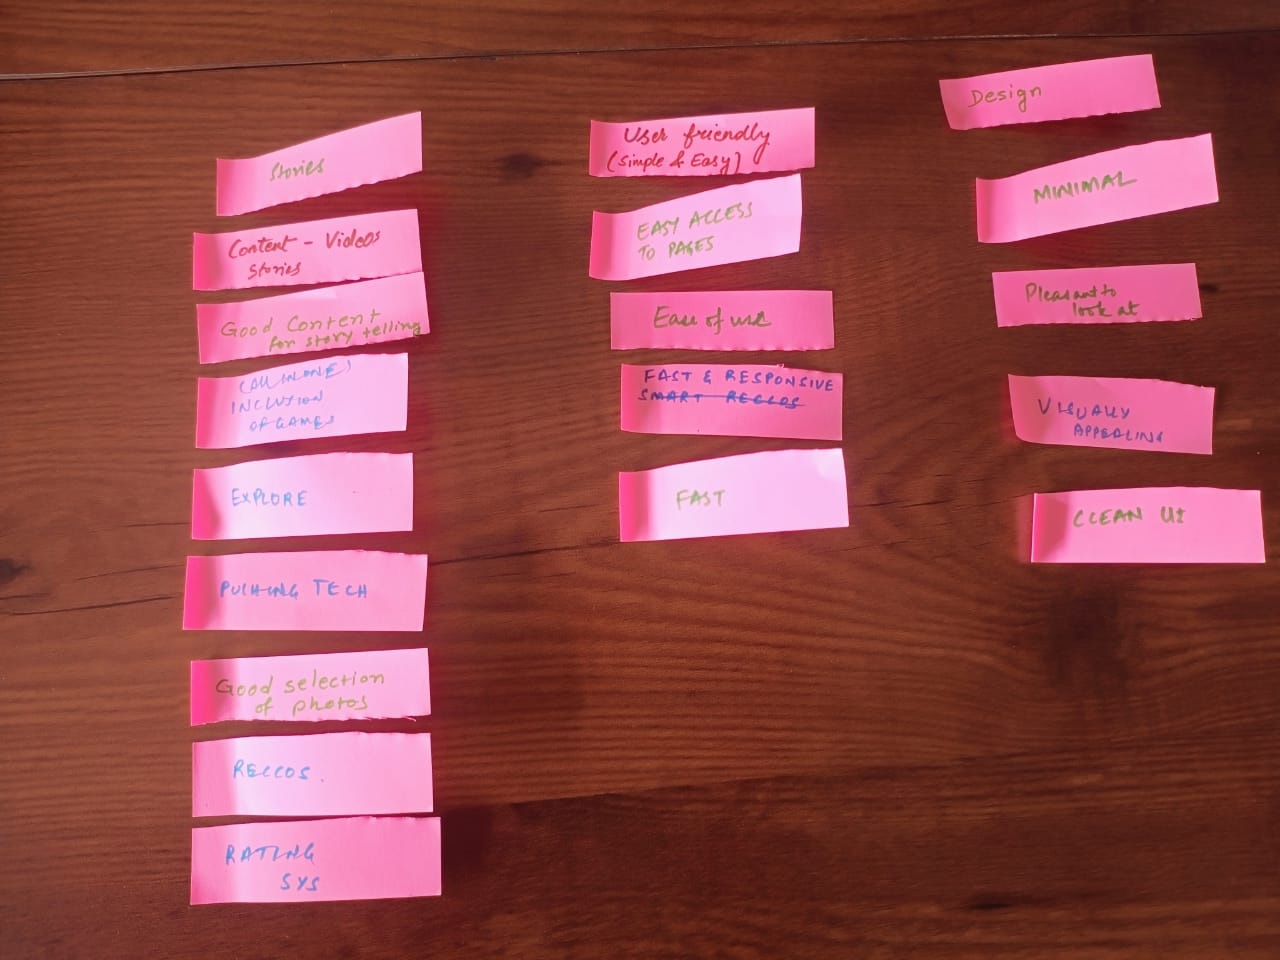
Note to facilitator: This is a good time to check in about challenges faced during the process, or what they found most insightful about the process. - Moving on the next activity, distribute a card, sticky notes and a sketch pen to all participants. Ask everyone to think of their favourite websites and three things they like most about the website. They can write each item on a sticky note and put it on the card. They need not identify the website if they don't want to.
Note to facilitator: Explain to the participants that a favourite website can also be a website that they frequent every day, like Imstagram or YouTube or Amazon. - Give the participants 10-12 minutes for this activity. Collect the cards from the participants as they finish.
- The facilitator can then start grouping the sticky notes together in groups to represent characteristics like Content, Design, Responsiveness, UI, etc. placed on the table. You can find some useful website characteristics here: https://wiki.aikyamfellows.org/books/build-a-beautiful-website-that-people-trust/page/guidelines-to-building-a-great-user-friendly-website
Note to facilitator: An assistant may be needed for this sorting. Facilitators can also add their choices.
Some examples for the grouping below:

- Invite participants to discuss what could be the common theme for each grouping. As they discuss and come up with answers, write down the headers for each grouping on a sticky note and place it on top of the grouping. This exercise should eventually visually represent that most of the characteristics falls under Content, and then, Design, and then other heads.
- Use this example to help the cohort understand why thinking through of content is so important for a website. Because telling the stories that your stakeholders want to know about or stay updated about keeps them engaged and coming back to your website. For Amazon, this may mean new products. For Instagram, this may mean more addictive reels; we all have doom scrolled on Instagram and would be familiar with this.
For changemaker websites, this often means stories about impact, case studies, program stories, etc. - You can also reiterate the importance of writing content for the primary stakeholders. One example that can be used here is to ask participants if they have all used Amazon/Instagram.
Do they know the vision/mission of Amazon/Instagram? Would they know where to find it? Do they care enough to find out?
Explain how when we create websites, we often put things that are very important to us as an org. up front. Often, people have the vision/mission right up there on the home page, in prime space that could be used for impact numbers or impact stories. Funders and other stakeholder are definitely more interested in the actual work you have done or the change you are building than your intentions to do good.
Reiterate that while the vision and mission is extremely important to the organisation, it may not be that important to key stakeholders of the organisation's website.
Learning outcomes
- Understanding the various attributes that make for a good website
- Understanding the importance of content planning for websites
Session 2
2 hours
Theme
Introduction to Ghost
Methodology
Ground rules to set for all sessions:
- Bring only the devices you need to the session. Note to facilitator: Explain here what is needed for this particular session
- Mute mobile phones before you put them away
- Encourage the participants to take space and make space. To take up space is to speak up and participate actively in discussions and putting their ideas and perspectives across. It is equally important to make space for others to do the same. Note to facilitators: Ensure you check in about this throughout the sessions, especially by making space for those who are not used to taking up space or struggling to do so.
- This is a safe space, and we encourage everyone to check their privilege and ensure that we do not discriminate in speech or action.
- Do remember there are no right or wrong answers. Note to facilitator: Repeating this during the sessions and activities helps participants speak up more freely.
Ghost Sessions
-
Session 1- Ghost Introduction
-
Session 2- Creating an Account and Setting up Ghost
-
Session 3- Dashboard Overview of Ghost
-
Session 4- Creating a Blog Post
- Session 5- Creating a Page
-
Session 6- Explaining Post Settings & Page Settings
-
Session 7- Saving and Publishing Posts & pages
-
Session 8- Advance setting for site & Editing the Theme
-
Session 9- Adding Team Members
-
Session 10- Managing SEO
Notes for the Facilitator
Welcome, Before starting today’s session, please take a moment to carefully read through these important instructions:
Preparation Time:- Ensure you review the entire curriculum at least 40 minutes before the session begins. This will help you understand the flow of the session and address any last-minute clarifications or adjustments.
Important Notes:- There are special notes for facilitators included in this document. These notes highlight key points to focus on during the session.
Materials & Readiness:- Verify that all necessary materials, tools, or resources mentioned in the curriculum are prepared in advance.
Before the session starts, make sure you have Ghost Admin Access for the Ghost website.
1- This access is needed to manage and show things during the session.
2- If you don’t have admin access, please contact the backend support team ahead of time to get it set up.
Session 1:
Ghost Introduction
Theme:
To introduce participants to Ghost, a platform for creating websites, blogs, and newsletters, and inspire them to use it for storytelling.
Materials Needs:
-
Projector or screen.
-
Laptop with internet connection.
Methodology
Facilitator
1- Welcome and Warm-Up (5 minutes):
Welcome everyone! Today, we are going to explore Ghost, an amazing platform designed to help you share stories through websites, blogs, and newsletters. The best part? You don’t need any coding experience to get started.
Have you ever wanted to share your stories with others but felt unsure about how to use the technology?
- Ghost is perfect for storytelling, whether you want to share your ideas, connect with a community, or showcase your work.
By the end of this session, you will feel confident and excited to explore Ghost.
2. What is Ghost?
Facilitator:
So, what exactly is Ghost? It’s a simple and user-friendly platform where you can create:
-
Websites to showcase your work.
-
Blogs for sharing stories and ideas.
-
Newsletters to connect with your audience."
Now, let’s compare this to using a programming language. Imagine you want to create a blog and share weekly updates with your followers or audience. You could solve this problem in two ways:
(Need to add a presentation for better understanding - Ghost vs code or wordpress )
Note for the Facilitator: Please open the provided document(link) and share your screen with the participants. Go through the examples in the document
Example-
Option 1: Use Code - You’d need to:
-
Write HTML for the structure of your website.
-
Use CSS to make it look good.
-
Add JavaScript for any interactive elements. etc….
This requires time, effort, and coding knowledge—and even small mistakes can cause big problems!

Important Note:- We are not saying you shouldn’t use code. If you enjoy coding or have the skills, it can be an amazing way to create a fully customized website. However, this session is designed for people who may not have coding knowledge or simply want a quicker and easier way to get started. Ghost is a perfect tool for that.
Option 2: Use Ghost- With Ghost, all of this is done for you:
-
Choose a template to design your blog.
-
Write and publish your stories using an easy editor—no coding needed.
-
Send newsletters directly using the built-in tools.
-
Building web pages for the site.
For Example - In simple terms, using code is like building a car from scratch which takes a lot of time and effort. while Ghost is like buying a ready-made car that you can customize and start driving right away. Ghost lets you focus on your content and storytelling without worrying about the technical parts.
3. Show Examples (10 minutes)
Facilitator:
Let’s look at some real-life examples to inspire you.
-
aikyam Fellows: This group uses Ghost to document stories about their amazing work in social impact. (Show on projector/screen)
- The Ignite Foundation: Here’s another example. The Ignite Foundation shares powerful stories about their initiatives using Ghost. (Show on projector/screen)
4. What Makes a Ghost Special? (10 minutes)
Facilitator:
Here is why Ghost is so awesome:
-
Storytelling Made Easy: You can focus on your content without worrying about technical stuff.
-
Customizable: You can design your site the way you want.
-
Built-in Tools: Features like newsletters are already included—no need to set up extra tools.
Outcome:
Participants will understand the purpose of Ghost and feel motivated to explore it as a platform for storytelling.
Session 2:
Creating an Account and Setting up Ghost
Theme:
Guide participants to create their own Ghost account and set up their site.
Materials Needs:
-
Participants’ devices
-
Shared Ghost instance URLs (provided by aikyam)
Methodology :
Sign up for Ghost :-Guide participants through creating a Ghost account and setting up their site.
Facilitator Instructions:
Note for the Facilitator:- (Before the session starts, please check that the Ghost link or access has been shared with the participants. This will help everyone be ready for the session.)
1- Ask participants to open their web browser and navigate to the Ghost instance shared with them (provided by aikyam before the session).
2- Instruct them to click “Get Started” and guide them to sign up using their email and set up their site.
Outcome:
Participants will have their own Ghost account and access to the dashboard.
Accessing the Ghost Backend:
Go to the website:- In your browser, enter the URL for the site provided (e.g., xyzwebsite.com).
Access the backend:- To access the Ghost admin dashboard, simply add “/ghost” to the website URL. For example, type xyzwebsite.com/ghost in the address bar.
Login:- Use the provided credentials to log in to the backend.
Session 3:
Dashboard Overview of Ghost
Theme:
Help participants get comfortable using the Ghost dashboard by explaining the main sections.
Materials Needs:
-
Facilitator’s laptop
-
TV screen & Devices of Participaints
Methodology
Facilitator Instructions:
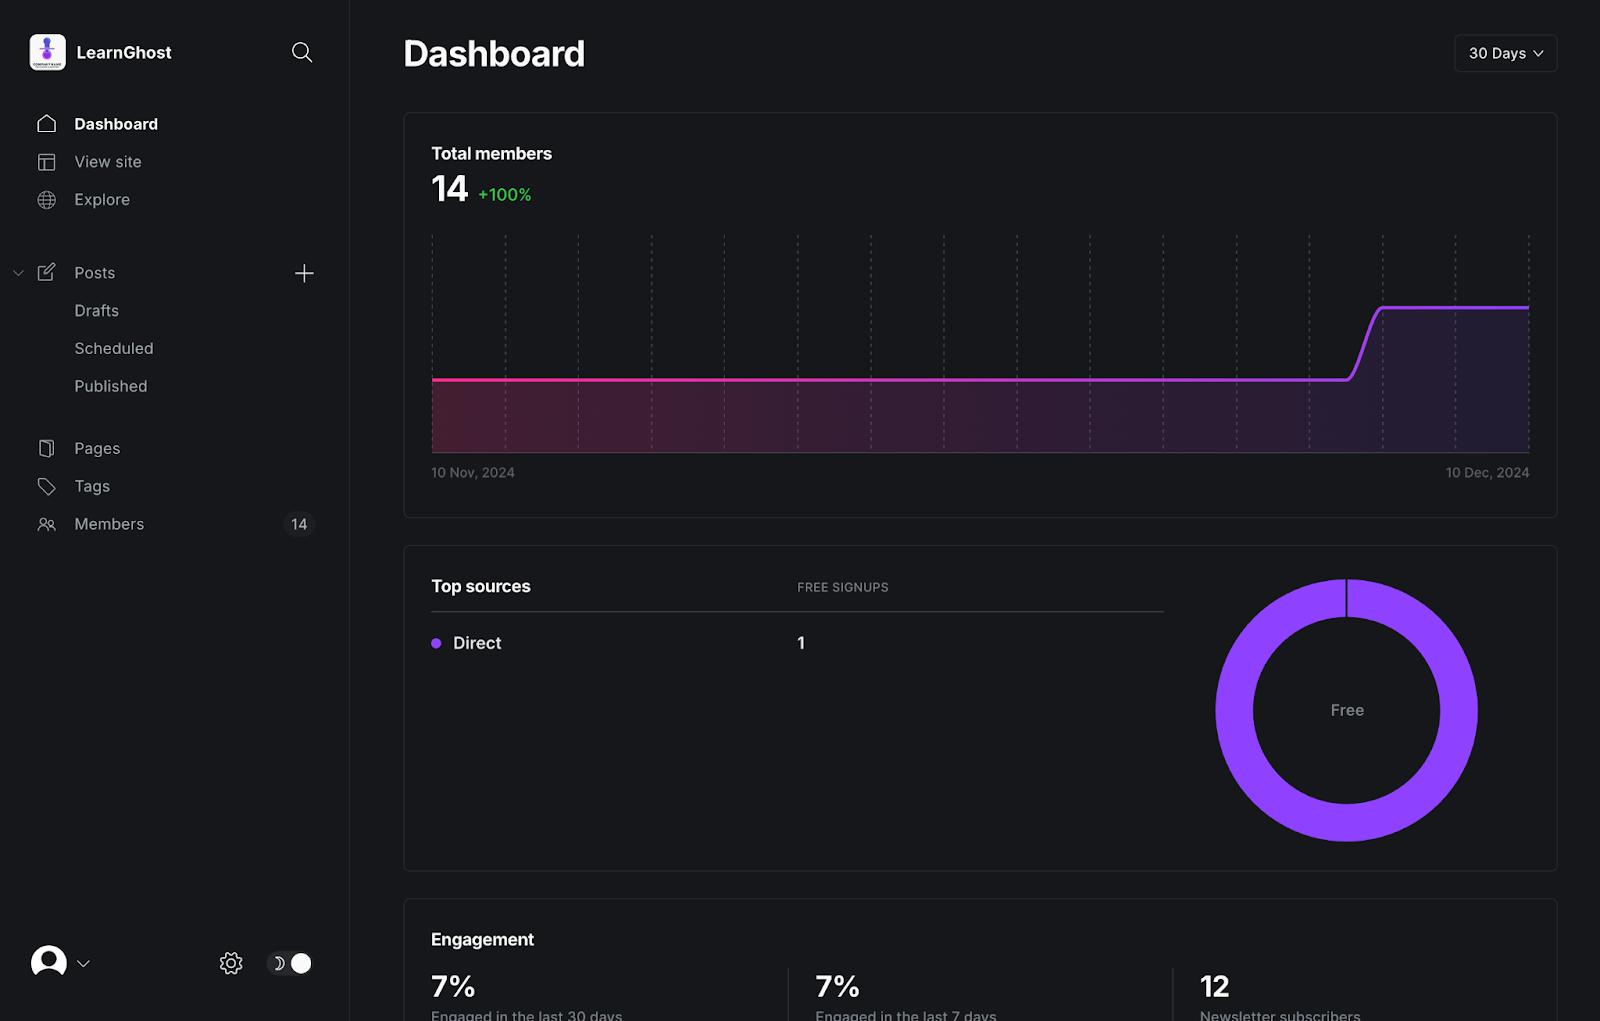
1- Dashboard:-
- This is the homepage of your Ghost backend. Here, you’ll see an overview of recent activity, posts, and others.
- Where to click: Direct the participants to the “Dashboard” tab on the left sidebar.
2- View Site:-
- This allows you to view the live version of your website.
- Where to click: In the left sidebar you can click on "View site". After clicking "View site," you’ll see a small icon next to it. Click on this icon, and your website will open in a new tab.

3- Explore:-
- Use this to explore other features and resources available on Ghost.
- Where to click: In the left sidebar, click "Explore" to find other tools and themes.
4- Posts:-
-
This is where you can create, edit, and manage blog posts.
-
Where to click: Click on "Posts" in the left sidebar to see a list of all posts. Here, you can create new posts, edit existing ones, and manage them.
Creating a Post :-
- After opening "Posts", you will see a "+" button. Click it to create a new post.
- In the top-right corner, there is a button labeled "New Post". Click on it to create a new post.
5- Published:
-
This section shows all the posts that are published.
-
Where to click: Under "Posts", click "Published" to view or edit the posts that are already published.
6-Pages:
-
Pages are used for static content, such as About, Contact, and other important informate.
-
Where to click: Click on "Pages" in the left sidebar to create and manage static pages.
8- Profile:
-
This is where you can update your account details, password, and other settings.
-
Where to click: Click on your profile icon in the left bottom corner and select "Profile icon" to make changes.
Outcome:
Participants will understand how to use the Ghost dashboard, including the purpose of Posts, Pages, and Tags.
Session 4:
Creating a Blog Post
Theme:
To help participants create and format blog posts using Ghost, and gain confidence in using its key features.
Materials Needs:
- Facilitator’s laptop and TV screen
- Participants’ devices
Methodology
Creating a Post:-
Teach participants how to create and format a post using Ghost. Show examples of posts to highlight the elements they will use.
Explain the Activity:
Let participants know they will practize creating a post by adding a title, uploading an image, writing content, and using extra elements like buttons and callout boxes.
Facilitator Instructions:-
Direct participants to the Posts section in the left menu. (Ask participants to follow the same steps as you show on screen )
Guide them to:
1- Posts Section:- On the left-hand menu, click on Posts. This will take you to the list of existing posts.
2-New Post:- After opening the "Posts" section, you have two options to create a new post:
- Option 1: Click the "+" button to create a new post.
- Option 2: In the top-right corner, click the "New Post" button to start creating a new post.
3- Add a Title to Your Post:
4- Upload a Featured Image:
- At the top of the editor, above the title area, you'll see an option labeled "Add feature image"
- Click it to upload an image from your device or choose one from Unsplash.
5- Start Writing Your Content:
-
Use the main editor area to write your content.
-
Encourage participants to explore the editor’s basic formatting options like headings, bold, italics, and lists. etc……
6- Use Additional Elements:

Show the Available Features:
Facilitator Note-
Share this Style Guide example link with participants so they can see a visual example of how to use the available features. to make their posts look better. Go over basic elements like headings, lists, quotes, and images to help them organise and style their post.
Activity: Participants will Create Their Own Blog Post:-
Ask participants to create a blog post on a topic of their choice and ask them to use at least 5 of the features in the blog.
Post Settings
Where to Access Post Settings:
-
Look at the top-right corner of your screen and find the Settings icon.
-
Click on the icon to open the Post Settings Panel.
Key Post Settings to Adjust:
-
URL: Edit the post URL if necessary for SEO or clarity.
-
Publish Date: Set a future or backdated publishing schedule.
-
Tags: Add relevant tags to organize your post by topic.
-
Excerpt: Write a brief summary that will appear in previews.
-
Authors: Ensure the correct author is assigned.
-
Featured Post: Find the "Featured" option, turn it on, and click "Update" to save the changes.
Saving and Publishing:-
Facilitator - (check the reference image )
To publish the post and page , look at the top-right corner of your screen. You will see a publish button—click on that.

Step-by-Step Instructions for Saving and Publishing

-
Saving as Draft
-
Publishing Immediately
-
Scheduling for Later
-
Publish Only (Without Email)
-
Publish and Email (Notify Subscribers)
-
Email Only (Without Publishing)
Outcome -
Participants will -
-
Create and format a blog post with a title, content, and featured image.
-
Use extra elements like buttons or callout boxes.
-
Adjust post settings (tags, excerpts, etc.).
-
Gain confidence in using Ghost to create and publish posts.
Session 5 :
Creating a page
Theme:
To help participants create pages using Ghost, and gain confidence in using its key features.
Materials Needs:
- Facilitator’s laptop and TV screen
- Participants’ devices
Methodology
Creating a Page:
Facilitator:-
Explain the difference between posts and pages, and Learn how to create a new page.
- Post: A blog post is for regular, time-sensitive content like articles, news updates, or stories.
- Page: A page is for timeless, static content that doesn't change often, like an About Us and Contact, or page. Pages are like important information sections that you can find in the website's menu.
Example -Show this example to participants to get the idea how to create a web page.
Note :- The Facilitator should look at this example before the session starts to understand the interface (UI) and get an idea of how to create a page using Ghost.
Facilitator Instruction: Guide participants through creating a blank page. (Ask participants to follow the same steps as you show on screen )
Guide them to:
1- Page Section:- On the left-hand menu, click on Pages. This will take you to the list of existing pages.
2-New page:- After opening the "page" section, you have two options to create a new page:
-
Option 1: Click the "+" button to create a new page.
-
Option 2: In the top-right corner, click the "New Page" button to start creating a new page.
3- Add a Title to Your Page:
4- Upload a Featured Image:
-
At the top of the editor, above the title area, you'll see an option labeled "Add feature image"
-
Click it to upload an image from your device or choose one from Unsplash.
5- Start Writing Your Content:
-
Use the main editor area to write your content.
-
Encourage participants to explore the editor’s basic formatting options like headings, bold, italics, and lists. etc……
6- Use Additional Elements:
Show the Available Features:
Facilitator Note-
Share this Style Guide example link with participants so they can see a visual example of how to use the available features. to make their pages look better. Go over basic elements like headings, lists, quotes, and images to help them organise and style their page.
Activity: Participants will Create Page
Ask participants to pick one of the given examples and recreate that web page using the same images and content (they can use dummy content). If they prefer, they can also create their own web page for practice.
- https://ghost.aikyamsolve.org/home-page/
- Need to create a dummy pages for the examples
- Need to create a dummy pages for the examples
Page Settings
Where to Access Page Settings:
-
Look at the top-right corner of your screen and find the Settings icon.
-
Click on the icon to open the Page Settings Panel.
Page Settings to Adjust:
-
URL: Edit the Page URL if necessary for SEO or clarity.
-
Publish Date: Set a future or backdated publishing schedule.
-
Tags: Add relevant tags to organize your Page by topic.
-
Excerpt: Write a brief summary that will appear in previews.
-
Authors: Ensure the correct author is assigned.
Saving and Publishing
Facilitator - (check the reference image )
To publish the Page and page , look at the top-right corner of your screen. You will see a publish button—click on that.

Step-by-Step Instructions for Saving and Publishing
-
Saving as Draft
-
Publishing Immediately
-
Scheduling for Later
-
Publish Only (Without Email)
-
Publish and Email (Notify Subscribers)
-
Email Only (Without Publishing)
Outcome:-
-
Participants will gain the skills to create, format, and publish web pages using Ghost.
-
Create and format a page with a title and content.
-
Use extra elements like buttons, images, or dividers to enhance the page.
-
Understand the difference between posts and pages.
-
Gain confidence in using Ghost to create and publish static pages.
Session 6 :
Explaining Post Settings & Page Settings
Theme:
Guide them through how they can access this page settings and post setting.
Materials Needs:
-
Facilitator’s laptop
-
TV screen
Methodology
The facilitator has to explain to them how they can access this page settings and post setting.
Facilitator - (check the reference image )
To access the page or post settings, look at the top-right corner of your screen. You will see a settings icon—click on that. This will open the settings panel where you can adjust things like the title, URL, tags, and other options for your page or post.

Step by step-
Click on the setting icon in top right.
-
Page URL
-
Publish date
-
Tags
-
Page access
-
Excerpt
-
Authors
-
Template
Key Differences:
Outcome:-
Understanding of page and post setting.
Session 7 :
Advance setting for site & Editing the Theme
Theme:
Guide them through how they can access this page settings and post setting.
Materials Needs:
-
Facilitator’s laptop & Participants Laptops
-
TV screen
Methodology
Teach participants how to change site settings and customise the theme following the steps given below.
Facilitator - (check the reference image )
To access the main setting - Open the Ghost dashboard and look at the left menu bar. Scroll down to the bottom, and click on the Settings icon.
Steps: (Ask participants to follow the same steps as you show on screen )
1- General Site Settings (15 minutes)
-
Site Title and Description:- In the General section, click Title & description. Update the Site Title and Site Description to describe your site.
- Meta Data: Show how to edit Meta data (title and description) for search engines to help the site appear in search results.
-
Social Media : Explain how to add link Social Media accounts like facebook and twitter.
-
Language and Timezone :- Teach how to change the Language and Timezone (if needed this can be skipped).
-
Staff: - Adding Team Members
Facilitator Instructions: - Show participants the Settings > Staff section, where they can invite team members by entering their email addresses.
Explain the four roles in Ghost and what permissions each role has:


2- Site Setting

Facilitator:-
-
Theme:
-
Open the Ghost dashboard.
-
Scroll to the bottom of the left menu and click on the Settings icon.
-
-
Design and Branding:
show how they can customize the look and feel of your site by adding your logo, changing color, publication cover.-
-
Add your Logo: Click on the logo section and upload your file.
-
Change the Colors: Select colors for your site’s branding.
-
Update the Publication Cover: Upload an image to display as the cover for your homepage or other key pages.
- Note:- Explore the Design Options: Options here depend on the theme you’ve selected. Check for layout or style changes you can customize.
-
-
- Navigation: Set up your site’s menu and links. This is how visitors will move around your site, so make sure it’s clear and easy to use.
Go to Navigation in the Settings menu.
1- Add Primary Navigation links:
-
These links appear in the header (top of the page).
-
Click Add Item, type the name of the link (e.g., “About Us”), and add the URL.
-
Save the changes.
2- Add Secondary Navigation links:
-
These links appear in the footer (bottom of the page).
-
Click Add Item, type the name, and add the URL.
-
Save the changes.
-


- Announcement Bar: This can be used to add a message at the top of your site. It’s great for sharing important updates, promotions, or announcements with your visitors.
Example :- show the aikyam website and the space website (aikyam fellows, aikyam space )
1- Aikyam fellows (which is saying"Residency | Making Storytelling Tools Accessible to NGOs: Apply Now " )

2- Aikyam space

Outcome:-
Participants will know how to navigate theme settings to make customizations.
Session 8 :
Adding Team Members
Materials Needs:
- Facilitator’s laptop and TV screen
- Participants’ devices
Methodology
1. Access the Staff Section
-
Open the Ghost dashboard.
-
Scroll down the left menu bar and click on the Settings icon.
-
Select Staff from the Settings menu.
2. Invite a Team Member
-
In the Staff section, click the Invite people button.
-
Enter the team member’s email address.
-
Choose their role from the dropdown menu (Admin, Editor, Author, Contributor).
-
Click Send Invitation to send the invite.
Outcome:-
Participants will be able to add team members, assign roles, and understand the permissions each role has for collaboration.
Session 9 :
Managing SEO
Theme:
Introduce participants to basic SEO settings for their posts and pages.
Materials Needs:
- Facilitator’s laptop and TV screen
- Participants’ devices
Methodology
Facilitator Instructions:
Show how to add meta descriptions, tags, and other SEO-related settings within the post editor and also in site settings.
Manage SEO in Ghost:
For Posts and Pages
-
Open the Ghost Editor for a post or page.
-
Click the Settings Icon in the top-right corner.
-
In the Post/Page Settings panel, find the Meta Data section.
-
Add a Meta Title: Write a descriptive title (different from the post title if necessary).
-
Add a Meta Description: Write a short summary (under 155 characters) explaining what the post/page is about.
-
Save changes by clicking Update or Publish.

Why are Meta Descriptions, Tags, and SEO Settings Important?
Meta descriptions, tags, and SEO settings help your site rank higher on search engines like Google. They make it easier for people to find your posts or pages when they search for relevant topics.
-
Meta Descriptions:- A short summary of your post or page that appears in search results. It gives users a quick idea of what the page is about.
-
Site SEO Settings:- These allow you to fine-tune how your site appears in search results, improving visibility and helping more visitors find your content.
Setting these up properly improves the chances that your audience will discover your content through search engines.
Outcome:-
Participants will understand basic SEO settings in Ghost to improve visibility.
Module 4 | Reach out to your audience
Session
2 hours
Theme
Using Ghost newsletters optimally to reach out to, and engage with audiences
Matherials needed
For the particpants: Chart paper (half size; to be prepped beforehand), sketch pens, title cards with Ghost formatting features listed like Title, Excerpt, Image gallery, etc (to be prepped beforehand).
For the facilitator: Laptop and a big screen to mirror the laptop screen
Methodology
Ground rules to set for all sessions:
- Bring only the devices you need to the session. Note to facilitator: Explain here what is needed for this particular session
- Mute mobile phones before you put them away
- Encourage the participants to take space and make space. To take up space is to speak up and participate actively in discussions and putting their ideas and perspectives across. It is equally important to make space for others to do the same. Note to facilitators: Ensure you check in about this throughout the sessions, especially by making space for those who are not used to taking up space or struggling to do so.
- This is a safe space, and we encourage everyone to check their privilege and ensure that we do not discriminate in speech or action.
- Do remember there are no right or wrong answers. Note to facilitator: Repeating this during the sessions and activities helps participants speak up more freely.
- Do a quick question game for 20-30 minutes; note to facilitators: other facilitators can also join in, if needed to make up numbers. This game works well with 4-1o participants.
- Kick off the game by asking a question related to Ghost.
- People can raise their hands if they know the answer.
- Pick a person to answer.
- Once they answer, you can check in with the group if the answer is correct. If people want to add to the answer or discuss it, allow a minute or so for this. You can also add extra points or info, if needed.
- The person who gave the answer can now ask a question, and the process is repeated until all the participants are covered or the time is up. - Start off the day's session with an activity. Have the participants gather into their groups.
Note to facilitator: This is a good time to check in if people would like to look at a change in the groupings. Depending on feedback, groups can be changed.
- Hand out a chart paper, and name cards that have the names of all formatting features in Ghost.
- Note to facilitator: Tell the participants this will be a team activity. The teams will be given a choice of problem statements to work with. They need to pick one, and think of a newspaper that will go out to the stakeholders. Each team has to map stakeholders and needs, and recreate the front page of this newspaper.
The challenge: this newspaper has to be created using only the Ghost formatting features, like Title, Image gallery, Callout, etc. - The points to be noted here:
- the teams have to work with the available space on the chart paper (ideal to give half of a chart paper to each team).
- they have to figure out 4-6 best Ghost features they will use to convey their stories; show them why only 4-6 elements can be used by placing cards on the chart paper and showing how they take up space.
- they have to write the actual content for each of the formats. For instance, if they are using a Title card, they have to actually write the title of their newspaper or main story. - Problem statements can include any of the following, or a new one.
- An NGO that works in the education sector wants to run a new program that focuses on getting more girls in rural areas to attend schools within a 10-km radius.
- A college is introducing a new course, and is at the start stage of inviting students to apply. They are also in the process of setting up a new building to accommodate the needs of more students on campus.
- A collective wants to reach out health care information and benefits to 400 families in a panchayat. - Each team gets 30 minutes to discuss and design the newspaper.
- After this, each team presents the newspaper and explains why they chose to format the 'news' in a certain way. Note to facilitator: Open the floor to discussions; other teams may ask questions. You can choose to award the best newspaper. Ask participants to choose the best newspaper and their reasons for choosing that newspaper.
- Explain how a newspaper is very similar to a newsletter that is sent out to members who are subscribed to the website. While a newspaper may come home every day, a daily newsletter may not always be welcome. Unless the topic is of vital interest to the audience. Example of aikyam jobs website, and members who are job seekers. In most cases, an ideal newsletter frequency varies from weekly to monthly updates.
- Share the screen to explain the basic settings of the Ghost newsletter:
Dashboard > Settings icon at the bottom of the left menu > Email newsletter in left menu
- Newsletter sending
- Recipients
- Newsletter design, branding and general settings
- Member management
- Mailgun intro (just a mention) - Demostrate, with the example of a few aikyam fellows and aikyam space newsletters how to think through ideas for sending newsletters.
Examples to use:
https://aikyamfellows.org/email/7c30f9a5-5a6f-48d1-84da-b99779c08832/
Use this as an example of a themed newsletter that was all about discoverability. It starts with a story about the missing link in storytelling being fundraising, uses a quote from an NGO founder (relatable, impactful), and showcases case studies where aikyam fellows have worked with NGOs to create websites for discoverability. It then leads to the Tools for Storytelling residency, where interested applicants can apply (Use of the bookmark, button features). The newsletter ends with an impactful case study written by an NGO founder who attended one of our residencies and went on to create an impact storytelling subdomain on his website (points to be covered: migrating stories and members from Substack, regular blogging, tracking)
https://aikyam.space/all-women-tech-residency/
Example of a blog post that also went as an emailer, as it was a vital update for us. - Explain how the Analytics Dashboard on Ghost can help them think through what is working, how they can write better newsletters for better engagement. Points to go over on the dashboard:
- Top sources
- Engagement metrics
- Individual email metrics: members who have received and opened the newsletter, links that were clicked within the newsletter
- Mention how Plausible can be used to track analytics on the entire website, and on posts that are not emailers as well. Note to facilitator: Plausible will be taught separately in Module 6 - Work: Each participant to create a newsletter on Ghost introducing their project or website, to send out to 5 new members. Friends or colleagues can be added as members (with consent), and the newsletters can be sent out to them.
Learning Outcomes
- An understanding of using Ghost to create and send newsletters
- An understanding of how to think through strategy around email content, everything from frequency to topics.
- An understanding of how to use content and various Ghost features to share information and create engagement.
Module 5 | Understand audience behaviour through analytics
Session
30 minutes
Theme
Using Plausible for website analytics
Methodology
Ground rules to set for all sessions:
- Bring only the devices you need to the session. Note to facilitator: Explain here what is needed for this particular session
- Mute mobile phones before you put them away
- Encourage the participants to take space and make space. To take up space is to speak up and participate actively in discussions and putting their ideas and perspectives across. It is equally important to make space for others to do the same. Note to facilitators: Ensure you check in about this throughout the sessions, especially by making space for those who are not used to taking up space or struggling to do so.
- This is a safe space, and we encourage everyone to check their privilege and ensure that we do not discriminate in speech or action.
- Do remember there are no right or wrong answers. Note to facilitator: Repeating this during the sessions and activities helps participants speak up more freely.
- Introduction (5 minutes)
- Activity: Pose an open-ended question: "Now that your website is live, what do you think should happen next?"
Encourage responses like "reaching people," "making an impact," or "getting feedback." - Lead the discussion to "How do we measure if our website is achieving its goals?" and introduce the concept of analytics as the answer.
- Activity: Pose an open-ended question: "Now that your website is live, what do you think should happen next?"
- Setting Context (5 minutes)
- Discuss the basic analytics available within Ghost (or the CMS they've used).
Example: Number of posts published, views on each post, etc. - Explain why external analytics tools like Plausible offer deeper insights.
"Ghost gives you some data, but what if you want to know where visitors come from or how long they stay?"
- Discuss the basic analytics available within Ghost (or the CMS they've used).
- Hands-On Exploration of Metrics (15 minutes)
- Exploring the Plausible Dashboard (5 minutes)
- Give a quick walkthrough of the Plausible interface:
- Highlight its simplicity, privacy focus, and key features like real-time data, goals, and reports.
- Discuss team management and how multiple people can collaborate on analytics.
- Give a quick walkthrough of the Plausible interface:
- Closing (5 minutes)
- Emphasize how analytics can guide decision-making: "Now you know how many visitors come and what they do on your site. What’s next? Optimize the user journey!"
- Encourage participants to ask questions about metrics they find confusing or intriguing.
Learning Outcomes
- Understand the importance of website analytics in tracking and improving audience engagement.
- Learn how Plausible provides privacy-focused, actionable insights compared to other analytics tools.
- Gain the ability to navigate and interpret the Plausible dashboard to track key website metrics, such as visitors, traffic sources, and user behavior.
- Understand how to create, customize, and utilize reports in Plausible for better decision-making.
- Recognize the value of features like goal tracking, team management, and notifications in managing website performance effectively.
Module 6 | No-stress ways to write better
Session 1
1 hour
Theme
Rethink what we mean by good writing, and prepare to write better.
Methodology
Ground rules to set for all sessions:
- Bring only the devices you need to the session. Note to facilitator: Explain here what is needed for this particular session
- Mute mobile phones before you put them away
- Encourage the participants to take space and make space. To take up space is to speak up and participate actively in discussions and putting their ideas and perspectives across. It is equally important to make space for others to do the same. Note to facilitators: Ensure you check in about this throughout the sessions, especially by making space for those who are not used to taking up space or struggling to do so.
- This is a safe space, and we encourage everyone to check their privilege and ensure that we do not discriminate in speech or action.
- Do remember there are no right or wrong answers. Note to facilitator: Repeating this during the sessions and activities helps participants speak up more freely.
- Ask participants about great books they enjoy reading or enjoyed reading in their childhood. Ask them why they enjoyed those books. Set aside 5-7 minutes to discuss answers.
- Explain how we tend to think of writing and immediately think of the standard of good writing as the great books we have read. We believe we are never going to be that great, and hence, cannot tell a good story. How can we be another Arundhathi Roy or a Tagore or a Margaret Atwood?
- However, the key here is to understand that we all have stories to tell, especially in terms of impact, and the audience we are trying to tell it to is very clear to us. We don't have to win a Nobel Prize for literature. All we need to do is to be able to tell our story in a way that it reaches our target audience.
- We can look at different formats of content for telling these stories. But clarity of thought begins with writing and that is why it is always good to start documenting all stories in writing first.
- What are the key things to do before one starts writing?
- Know your audience
- Research
- Write a synopsis
Each of these points are explained here: https://wiki.aikyamfellows.org/books/comms-for-good-lets-write-better-starting-now/page/before-you-start-writing - Explain the importance of a synopsis. You can use personal stories for this.
Or use the example of Stan Lee, who was creative head of Marvel Comics and has created iconic characters like Spiderman, X-Men, Black Widow, Iron Man and more. For each book, he would discuss ideas with his editor and team and make sure a written synopsis comes out of the discussion, which is circulated among everyone working on the project. This is how he made sure all workable ideas are documented and executed. He started out by recording the discussions and sharing it with the team but then he quickly figured no one was listening to the tape, and referencing it when they were stuck. And that is how they progressed to the written synopsis. - Every synopsis should cover the following points: who you are writing for, what they will take away from this piece (do you want them to learn something/take action?), the broad idea of what you are trying to cover and all the important points you need to touch upon within this topic.
- Using all the information they now have, about the audience and the synopsis, ask each participant to write down the topic of one of the blog posts they have written as prep work for the residency. Now, ask them to write a 70-100 word synopsis on one of the blog posts they have already written for their project.
- Give them 20 minutes for this exercise, following which they can read out their synopsis.
Outcomes
- Understanding what good writing means in terms of impact storytelling
- Understanding the basics of prepping for writing
- Being able to craft a synopsis
Session 2
2.5 hours
Theme
Hacks and tools to write better
Materials needed
For the participants: Laptop
For the facilitator: https://wiki.aikyamfellows.org/books/comms-for-good-lets-write-better-starting-now/page/just-write
Methodology
- The only way to get better at writing is just by writing. Explain how it is not inspiration that helps one write. Inspiration is just the starting point. The actual writing is a habit that one can learn, and get better at over days of doing it.
- Spare at least an hour a day for actual writing. Discuss hacks to find time like habit stacking and finding productive times where you allow for zero distractions.
- Use hacks from this Comms for Good book on writing to write better: https://wiki.aikyamfellows.org/books/comms-for-good-lets-write-better-starting-now/page/just-write
Participants can go through the entire book in their time, but go over the following points with them
- Putting everything in the first draft
This is important to ensure all your ideas come out. This can then be re-drafted to suit the synopsis.
- Hack for structuring large pieces of content better
When you have to cover a lot of ground and have too many points to go over, it can become difficult to structure the content smoothly. Write each point to be elaborated as a block of content. You can number these blocks, and use the numbering to move the blocks around for a quick visual look at how the content should flow. You can try combinations until you find one that sits right. You can do this using text blocks or using pen and paper.
If it helps, even Nobel Prize-winning authors like Kazuo Ishiguro follow this technique.
Note to facilitator: Refer earlier link for details. In my case, I often talk about how I used to anchor cover stories that were written by multiple reporters and had to be made into a coherent whole. I used to pick up the points and sections I want to work with, number them and move them around until I was satisfied. Then I would start building the story based on this structure.
- How to get over a writing block
AI to the rescue.
Note to the faciliator: The link has a detailed example that includes prompts that participants can work through.
- Using hemingwayapp to check for readability
Hemingwayapp gives a readability score based on the grade (school levels) that can understand your writing. For instance, a readability score of Grade 7 means someone in class 7 can understand your writing.
Aim for Grade 10 readability or lower.
You can use the tips mentioned in the Comms for Good book to write better. In general practice, it is a good idea to use simpler words, avoid long and confusing sentences, use active voice and use fewer adjectives and adverbs.
- Write inviting title and crisp intros
Titles should pull the reader into the story. These are best kept short and simple; try not to use big words. A good headline is ideally not more than 7-8 words (60-70 characters). - Work: Participants to check their existing blog posts (from the Success Pack) for readability on hemingwayapp. They must rewrite their blog posts according to their synopsis, keeping their audience in mind. Each blog post must score Grade 10 or less on the hemingwayapp.
Note to facilitators: Share the link of the Comms for Good book to the participants. Allow them an hour for rewrite. Ask them to share the completed documents with you with the commenting option enabled.
Learning outcomes
- Understanding that writing is a skill like any other, and can be improved by practice
- Learning how to write better for their audiences
- Feeling more confident about writing and creating content ideas using these hacks.